WELCOME TO RIVER DAVES PLACE

1st GS Hood I Sold

Craig

Well-Known Member
Joined
Feb 25, 2008
Messages
115
Reaction score
63
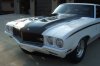
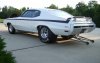
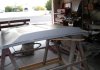
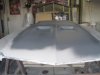
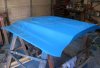
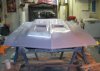
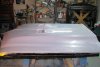
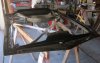
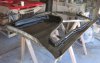
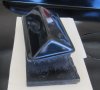
I sold my first Buick GS Cowl Induction hood and the guy just got it finished and mounted on his racecar. This GSX runs mid 9's at over 140 mph. He'll be testing it for me to see how it holds up at higher speeds than my GS runs.
 

Attachments

  • reynolds3.jpg
    reynolds3.jpg
    65.7 KB · Views: 573
  • reynolds4.jpg
    reynolds4.jpg
    74.4 KB · Views: 564
  • reynolds5.jpg
    reynolds5.jpg
    78.8 KB · Views: 564
  • reynolds6.jpg
    reynolds6.jpg
    76.6 KB · Views: 566
  • reynolds8.jpg
    reynolds8.jpg
    89.2 KB · Views: 563
  • reynolds9.jpg
    reynolds9.jpg
    78.3 KB · Views: 562
  • reynolds10.jpg
    reynolds10.jpg
    266.4 KB · Views: 566

RitcheyRch

Currently Boat-Less
Joined
Sep 20, 2007
Messages
65,409
Reaction score
83,693
Hood and car look good. I love those old Buick's.
 

margaret

Member
Joined
Mar 4, 2011
Messages
8
Reaction score
0
I sold my first Buick GS Cowl Induction hoods and the guy just got it finished and mounted on his racecar. This GSX runs mid 9's at over 140 mph. He'll be testing it for me to see how it holds up at higher speeds than my GS runs.

love the buick. that was a very nice hood. can you recommend a brand of cowl induction hood? im planning to buy one for my buick. thanks a lot. ang apology for making this thread up.
 

Craig

Well-Known Member
Joined
Feb 25, 2008
Messages
115
Reaction score
63
Well Steve got the GS out to the Buick GS Nationals and won the Quick 16 class with a bunch of 9.40's. Got some good feedback on the hood and decided to make a few changes to the plug and make a new mold.
 

Attachments

  • 2011-11-11_110719.jpg
    2011-11-11_110719.jpg
    199.2 KB · Views: 423
  • 2011-11-11_111043.jpg
    2011-11-11_111043.jpg
    208.7 KB · Views: 425
  • 2011-11-11_111013.jpg
    2011-11-11_111013.jpg
    200 KB · Views: 412

Craig

Well-Known Member
Joined
Feb 25, 2008
Messages
115
Reaction score
63
Most people said the only thing they'd change is the dip behind the scoops. So I flattened that out the took a section of an old flat Skylark glass hood I had and attached it to the back. I ran a piece of 3/8" angle down the middle then screwed it down on the edges for glassing to give the area a slight convex shape. Had to section the scoops and tilt them slightly so the transition was smooth. Got the 1st coat of primer on yesterday. Still have a lot of sanding and primer to go before painting the plug. I also added a slight lip at the back of the center section as well.
 

Attachments

  • cut8.jpg
    cut8.jpg
    92.7 KB · Views: 402
  • new3.jpg
    new3.jpg
    98.3 KB · Views: 400
  • new4.jpg
    new4.jpg
    108.5 KB · Views: 392
  • new7.jpg
    new7.jpg
    91.5 KB · Views: 393

Craig

Well-Known Member
Joined
Feb 25, 2008
Messages
115
Reaction score
63
Well, I got the plug painted. Used a blue to show more contours. Started waxing it with mold release wax this weekend. Build the flanges this coming weekend and get ready to lay up the mold soon after. When I look at the new plug and the current hood, the new one looks a lot better with the slight convex shape on the back :D
 

Attachments

  • plug34.jpg
    plug34.jpg
    104.5 KB · Views: 368
  • plug37a.jpg
    plug37a.jpg
    143.1 KB · Views: 369

Craig

Well-Known Member
Joined
Feb 25, 2008
Messages
115
Reaction score
63
Pulled the mold off of the plug today. Still have to watersand everything and polish it out before the first hood lay up!
 

Attachments

  • IMG_6.jpg
    IMG_6.jpg
    100.7 KB · Views: 277
  • IMG_5.jpg
    IMG_5.jpg
    116.1 KB · Views: 273

69GS

Well-Known Member
Joined
Dec 6, 2009
Messages
488
Reaction score
91
Looks great, kind of partial to the Buicks👍
 

Craig

Well-Known Member
Joined
Feb 25, 2008
Messages
115
Reaction score
63
Well, here's the 1st hood from the new mold
 

Attachments

  • done4.jpg
    done4.jpg
    112 KB · Views: 196
  • done5.jpg
    done5.jpg
    105.3 KB · Views: 200
  • done7.jpg
    done7.jpg
    99 KB · Views: 182

Craig

Well-Known Member
Joined
Feb 25, 2008
Messages
115
Reaction score
63
Next was bonding in the glass under hood frame I made so I could use the factory hinges and latch. Then I decided to add an air box to feed the air from the back to the carb. Finally I decided to make a mold off of this to save time and weight on the next hood, so I painted it so it had a harder surface to wax to make a mold.
 

Attachments

  • under5.jpg
    under5.jpg
    122.5 KB · Views: 171
  • under4.jpg
    under4.jpg
    96.3 KB · Views: 192
  • under3.jpg
    under3.jpg
    82.2 KB · Views: 175
  • under2.jpg
    under2.jpg
    77.9 KB · Views: 184
  • under1.jpg
    under1.jpg
    114.6 KB · Views: 186

Craig

Well-Known Member
Joined
Feb 25, 2008
Messages
115
Reaction score
63
Here's the completed under hood bracing mold that now incorporates the back vertical section, the bracing and the air box all in one mold. Save time making the part and it'll be lighter than the first one where I molded all three parts together. I still have to sand and buff the mold out. Then I also made two other molds. One was copying the 70-72 GS radio bezel. These are getting hard to find and if you want to put a modern radio in, you screw a plate to an original and cut it out. You'll be able to put switches or gauges on this as well if it's a racecar. Finally I copied a factory fan shroud that was broken in 4 pieces. This is for an early 70's Jeep Wagoneer that came with a factory Buick 350. A guy told me these are very hard to find used and a freind suggested he contact me about making a custom mold and eventually a new shroud.
 

Attachments

  • brace40a.jpg
    brace40a.jpg
    112.5 KB · Views: 193
  • brace42a.jpg
    brace42a.jpg
    115.1 KB · Views: 190
  • bezel3.jpg
    bezel3.jpg
    43.4 KB · Views: 188
  • shroud31.jpg
    shroud31.jpg
    83.1 KB · Views: 177
  • shroud33.jpg
    shroud33.jpg
    70.7 KB · Views: 174
Last edited:

Craig

Well-Known Member
Joined
Feb 25, 2008
Messages
115
Reaction score
63
Cleaned up and back on the car :D
 

Attachments

  • done73a.jpg
    done73a.jpg
    74.4 KB · Views: 165
Top