WELCOME TO RIVER DAVES PLACE

Fixing up my house.

Joined
Sep 24, 2007
Messages
1,064
Reaction score
3
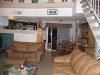
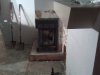
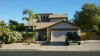
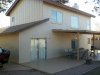
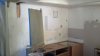
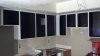
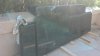
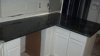
I picked up this house as a foreclosure in November. I have lots of plans beyone the obvious tree trimming, and landscaping. The house is going to need a brick fence installed on the east side that borders the road along with an RV gate because the one there now isn't worth beans. The whole house is getting painted inside and out. The fireplace is getting relocated because it is on the small side and I don't like the way it is set up right now. I'm thinking that a grill / bar / fireplace out back rear the pool is in order as well.

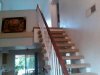
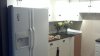
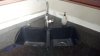
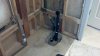
The following are pictures of the house when it was sold for some rediculous amount of money a few years ago. This is obviously pre foreclosure.
 

Attachments

  • ISymysxempmkkj.jpg
    ISymysxempmkkj.jpg
    50.6 KB · Views: 1,718
  • ISzfq7kio30vj7.jpg
    ISzfq7kio30vj7.jpg
    56.5 KB · Views: 1,715
  • ISzfq7m5v0eisj.jpg
    ISzfq7m5v0eisj.jpg
    47.5 KB · Views: 1,712
  • ISzfq7m9t2mmqr.jpg
    ISzfq7m9t2mmqr.jpg
    46.1 KB · Views: 1,732
  • ISzfq7m1wy6eub.jpg
    ISzfq7m1wy6eub.jpg
    55.6 KB · Views: 1,698
  • ISymysx2siy8pv.jpg
    ISymysx2siy8pv.jpg
    56 KB · Views: 1,720
  • ISymysxueyj0df.jpg
    ISymysxueyj0df.jpg
    64.7 KB · Views: 1,724
Joined
Sep 24, 2007
Messages
1,064
Reaction score
3
The fireplace relocation and fix up is starting much sooner than I had hoped. I came home the other day and the living room was flooded. Fortunately I didn't have any furniture moved in yet. After hours of searching, I discovered that the water was coming from under and therefore behind the fireplace which backs the kitchen. I decided that since I wanted to do work on the fireplace, and since I didn't want ot tear out the new kitchen cabinets, that I would start the fireplace demo and go from there. What I found was a leaky pipe that lead to a remote refrigerator water hook up. I had no idea the fixture was there since whoever installed the cabinets put them right over the fixture. The bright side is I don't have to run water to the fridge from the sink about 20' away anymore.. The dark side is, I had to fix the leak and begin the fireplace project early. At this point the leak is fixed and everything is drying out with an industrial dehumidifier. I have off of work for 4 days starting tomorrow so hopefully I can get a lot done.
 

Attachments

  • IMG00408.jpg
    IMG00408.jpg
    53.9 KB · Views: 1,658
  • IMG00409.jpg
    IMG00409.jpg
    43.6 KB · Views: 1,645
Joined
Sep 24, 2007
Messages
1,064
Reaction score
3
Before the leak started I began work on the kitchen. It might be on hold for a bit, but here is a before picture. Someone textured and then painted over wallpaper before the wall paper started to peal. It looks like crap up close. Thats all fixed and it's already been painted over. The plan is to do a slate backsplash over granite counter tops. Granite is $$$$ and the slate san't be done first so this might take awhile too. I do have appliances ready to install though. It amazes me that this house has a soft water system and water purification under the sink but no garbage disposal. Seriously? This needs to be fixed.
 

Attachments

  • 6046-e-ivy-st-mesa-arizona-85205-1.jpg
    6046-e-ivy-st-mesa-arizona-85205-1.jpg
    45.2 KB · Views: 1,653

Crazyhippy

Haters gonna Hate
Joined
Aug 24, 2008
Messages
6,835
Reaction score
5,206
I bought the biggest, meanest, manliest garbage disposal Home Depot had. It is 1/2 as loud as the cheap ones, and i swear it could double as a tree chipper. The wife doesn't use it, just keeps pushing stuff down there, till the water stops draining. Never had an issue w/ powering thru accumulated Crap.

Highly recomended:thumbsup
 
Joined
Sep 24, 2007
Messages
1,064
Reaction score
3
Here is the progress on the fireplace.

I located a used but very good condition firebox that will fit the bill nicely. It is gas ready so I will be installing a propane unit since I don't have any gas to the house. The framing is almost complete in the second picture, just a bit to go..
 

Attachments

  • IMG00420.jpg
    IMG00420.jpg
    51 KB · Views: 1,578
  • IMG00424.jpg
    IMG00424.jpg
    54 KB · Views: 1,591

Wheeler

I'm just here to bitch about others negativity.😁
Joined
Dec 25, 2007
Messages
24,921
Reaction score
39,106
Looking Good! :thumbsup I wish I had your ambition, I'm getting old and lazy. :grumble:
 
Joined
Sep 24, 2007
Messages
1,064
Reaction score
3
I bought the biggest, meanest, manliest garbage disposal Home Depot had. It is 1/2 as loud as the cheap ones, and i swear it could double as a tree chipper. The wife doesn't use it, just keeps pushing stuff down there, till the water stops draining. Never had an issue w/ powering thru accumulated Crap.

Highly recomended:thumbsup

*buy biggest disposal possible* - Check! Thanks for the tip!

Looking Good! :thumbsup I wish I had your ambition, I'm getting old and lazy. :grumble:

Trust me Wheeler, It takes it's toll on me too. After working all weekend on this project, I can't wait to check it off the list. I just ordered the gas log kit. As soon as it gets here I can button everything up.
 
Joined
Sep 24, 2007
Messages
1,064
Reaction score
3
So the fireplace is framed and ready to install the veneer stone. Hopefully in the next couple weeks I will have time to complete that project. The pic shows the present status. The gas logs are installed and functional. The carpet was also restretched and reinstalled.

Second pic shows the stair railing that was repainted, as well as the hand rail that I stripped, sanded and stained to match furniture.
 

Attachments

  • IMG00228-20100429-1832.jpg
    IMG00228-20100429-1832.jpg
    47.9 KB · Views: 1,447
  • IMG00267-20100509-2021.jpg
    IMG00267-20100509-2021.jpg
    81.4 KB · Views: 1,456

WTRR

Not On The Boat
Joined
Dec 19, 2007
Messages
3,303
Reaction score
338
Looking good. The fireplace is a vast improvement over the original. As for a disposal, I just repalced a Kitchen-Aid with an Insinkerator brand. Thing is a freaking beast and so quiet you can hardly hear it running.

Looking Good...
 

TPC

Wrenching Dad
Joined
Sep 20, 2007
Messages
30,570
Reaction score
22,880
Amazing.
Beautiful :thumbsup
 
Joined
Sep 24, 2007
Messages
1,064
Reaction score
3
Well tons of work has gone into this place so far and it really doesn't show in the pictures. I haven't done much to the fireplace because I'm waiting for the stone I want to use.

I did however manage to replace the crappy plexiglass front door side light with a nice steel and glass fixture. I guess someone broke the original glass so the previous home owner glued in some plexiglass junk to make it look ok. It had to go so I bumped it up in priority. Unfortunately I don't have a before picture, but I do have an after as seen below. Just imagine a $2 piece of smoked plastic super glued in place of the nice glass and steel piece.

The entire front of the house has been meticulously painted top to bottom as well.
 

Attachments

  • 167.jpg
    167.jpg
    17.1 KB · Views: 882
  • 170.jpg
    170.jpg
    58.8 KB · Views: 859
Joined
Sep 24, 2007
Messages
1,064
Reaction score
3
The east side is finally done... We bought a paint sprayer with a roller attachment that makes real quick (and quality) work out of the stucco.

The rest of the house is "cut in" so the paint sprayer (roller) will make real quick work out of it. The external painting should be done next weekend.

The third picture will serve as a "before" picture of the garage. I'm thinking this might be the next project to tackle.
 

Attachments

  • 2011-01-30_16-10-42_15.jpg
    2011-01-30_16-10-42_15.jpg
    67 KB · Views: 707
  • 2011-01-30_16-12-26_606.jpg
    2011-01-30_16-12-26_606.jpg
    57.8 KB · Views: 721
  • 2011-01-30_16-10-18_871.jpg
    2011-01-30_16-10-18_871.jpg
    49.3 KB · Views: 727
Joined
Sep 24, 2007
Messages
1,064
Reaction score
3
The painting is done.. Still some small steps like reinstalling outlets and trim painting the porch. Here are the pics after I took the scaffolding down. The final pic is the front porch where we replaced the rotten drywall ceiling with some nice tongue and groove slats.
 

Attachments

  • 2011-03-01_16-53-05_465.jpg
    2011-03-01_16-53-05_465.jpg
    55.9 KB · Views: 677
  • 2011-03-01_16-53-35_526.jpg
    2011-03-01_16-53-35_526.jpg
    60.4 KB · Views: 647
  • 2011-03-01_16-54-18_659.jpg
    2011-03-01_16-54-18_659.jpg
    74.7 KB · Views: 653
  • 2011-03-01_16-54-36_557.jpg
    2011-03-01_16-54-36_557.jpg
    36.3 KB · Views: 668
Joined
Sep 24, 2007
Messages
1,064
Reaction score
3
Back to the fireplace. I decided to do this one in slate. The ledge is done so far.
 

Attachments

  • 2011-06-09_22-53-40_29.jpg
    2011-06-09_22-53-40_29.jpg
    40.5 KB · Views: 579
Joined
Sep 24, 2007
Messages
1,064
Reaction score
3
I got a lot done last weekend. The fireplace tile is done with the exception of some finishing work and sealer. I also relocated two electrical outlets and did a small backsplash over the benches. I will have pictures of those soon.

I picked up this TV for cheap and decided to conceal the wires behind the fireplace for a clean look. Believe it or not, I can remove the top of the fireplace and climb back there to do the wire work at any time. The BluRay player and audio amplifier are hidden as well. I still have to install speakers and some finishing touches.
 
Joined
Sep 24, 2007
Messages
1,064
Reaction score
3
:D
 

Attachments

  • 2011-07-08_23-44-20_184.jpg
    2011-07-08_23-44-20_184.jpg
    45.1 KB · Views: 723
  • 2011-07-09_15-12-11_858.jpg
    2011-07-09_15-12-11_858.jpg
    49.8 KB · Views: 674
  • 2011-07-09_12-59-12_207.jpg
    2011-07-09_12-59-12_207.jpg
    39.2 KB · Views: 720
Joined
Sep 24, 2007
Messages
1,064
Reaction score
3
Since last update, I ripped up the carpet and tile and bought enough tile to do the bottom floor. I elected to use 18" real stone travertine and I am really happy with the purchase. It's sitting in my garage and ready to install when the walls are done. I've painted a few walls but have several to go before I can lay the floor. The house is like an echo chamber right now.

Last night I finished removing the wallpaper in my bedroom so that I can texture (knockdown) and paint. Tonight the bathroom gets the same treatment. This is all required before the tile can be installed.

Pics to come.
 
Joined
Sep 24, 2007
Messages
1,064
Reaction score
3
Pics to follow.

All the mirrors in the house are down and the holes that were left from the glue are patched. The master bedroom is textured and ready for paint. What a difference already!

The master bathroom is completely gutted. The shower walls are getting stone, and new cabinets are going in. The lighting is being updated to LED can lights from the old style florescent.

Living room received new paint and wood blinds. This weekend the dining room, hallway, and master bedroom / bathroom should be getting paint.

New roof and AC are in the works.
 
Last edited:
Joined
Sep 24, 2007
Messages
1,064
Reaction score
3
:D
 

Attachments

  • 2012-02-18_13-29-07_618.jpg
    2012-02-18_13-29-07_618.jpg
    19.2 KB · Views: 481
  • 2012-02-18_13-29-03_981.jpg
    2012-02-18_13-29-03_981.jpg
    28.2 KB · Views: 465
  • 2012-02-18_13-28-52_362.jpg
    2012-02-18_13-28-52_362.jpg
    26.7 KB · Views: 450
  • 2012-02-18_13-28-38_136.jpg
    2012-02-18_13-28-38_136.jpg
    24.9 KB · Views: 455
  • 2012-02-20_19-40-35_716.jpg
    2012-02-20_19-40-35_716.jpg
    18.6 KB · Views: 460
  • 2012-02-20_19-40-47_369.jpg
    2012-02-20_19-40-47_369.jpg
    16.4 KB · Views: 487
Joined
Sep 24, 2007
Messages
1,064
Reaction score
3
New paint, blinds, and Turkish travertine. No grout or baseboards yet.
 

Attachments

  • 2012-04-29_19-29-46_997.jpg
    2012-04-29_19-29-46_997.jpg
    33.2 KB · Views: 365
  • 2012-04-29_19-29-27_381.jpg
    2012-04-29_19-29-27_381.jpg
    37 KB · Views: 376
  • 2012-04-29_19-29-15_28.jpg
    2012-04-29_19-29-15_28.jpg
    34.2 KB · Views: 369
Joined
Sep 24, 2007
Messages
1,064
Reaction score
3
Walls are cleaned up, no more holes, wallpaper down, textured, and painted!
 

Attachments

  • 2012-06-05_16-08-09_204.jpg
    2012-06-05_16-08-09_204.jpg
    17.9 KB · Views: 462
  • 2012-06-05_16-07-56_871.jpg
    2012-06-05_16-07-56_871.jpg
    19.3 KB · Views: 477
  • 2012-06-05_16-07-50_522.jpg
    2012-06-05_16-07-50_522.jpg
    13.1 KB · Views: 475
  • 2012-06-05_16-07-41_424.jpg
    2012-06-05_16-07-41_424.jpg
    24.1 KB · Views: 481
Joined
Sep 24, 2007
Messages
1,064
Reaction score
3
After disappearing to Manhattan for awhile, I returned to complete this project. I'll try to remember where I left off. The bedroom got a healthy coat of paint, and crown installed. I also took out the crappy old fan that the previous owner had electrical strung along the ceiling and plugged into an outlet in order to run it. I concealed the wiring and installed a nice new fan with remote control so I can be lazy when it's time to turn off the lights at night. The closet got a new light fixture. I also installed a floating wood floor. You can see the blue underlayment I used to keep moisture out and deaden sound and provide support. I installed nice transition strips where the wood meets the tile. I wall mounted the TV and ran electrical and cables behind the tv for a clean look
 

Attachments

  • IMG_20130330_163333_806.jpg
    IMG_20130330_163333_806.jpg
    21.6 KB · Views: 208
  • 2013-01-13_19-18-55_649.jpg
    2013-01-13_19-18-55_649.jpg
    22.8 KB · Views: 202
  • 2013-01-26_21-40-39_444.jpg
    2013-01-26_21-40-39_444.jpg
    33.2 KB · Views: 202
  • 2013-01-26_21-40-58_311.jpg
    2013-01-26_21-40-58_311.jpg
    36.4 KB · Views: 199
  • 2013-01-26_21-41-09_628.jpg
    2013-01-26_21-41-09_628.jpg
    14.4 KB · Views: 231
  • 2013-01-27_19-15-32_329.jpg
    2013-01-27_19-15-32_329.jpg
    47.3 KB · Views: 203
  • 2013-01-27_20-06-51_159.jpg
    2013-01-27_20-06-51_159.jpg
    32.3 KB · Views: 200
  • 2013-01-29_20-04-21_244.jpg
    2013-01-29_20-04-21_244.jpg
    28.9 KB · Views: 218
  • 2013-01-29_20-04-28_249.jpg
    2013-01-29_20-04-28_249.jpg
    31.2 KB · Views: 214
  • 2013-02-09_19-51-43_549.jpg
    2013-02-09_19-51-43_549.jpg
    23.5 KB · Views: 199
  • 2013-02-09_19-51-59_164.jpg
    2013-02-09_19-51-59_164.jpg
    32.6 KB · Views: 204
  • 2013-02-09_19-52-08_64.jpg
    2013-02-09_19-52-08_64.jpg
    31.8 KB · Views: 205
  • 2013-02-17_13-54-19_18.jpg
    2013-02-17_13-54-19_18.jpg
    13.9 KB · Views: 201
Last edited:
Joined
Sep 24, 2007
Messages
1,064
Reaction score
3
After the tree fell in the back yard, I had to figure out how to remove the trunk. I got a little creative and used the truck to apply a little weight to coax it out of the ground. Success!
 

Attachments

  • 2012-06-23_18-35-19_461.jpg
    2012-06-23_18-35-19_461.jpg
    83.5 KB · Views: 228
  • 2012-06-23_17-40-40_40.jpg
    2012-06-23_17-40-40_40.jpg
    57.8 KB · Views: 194
  • 2012-06-23_17-43-33_581.jpg
    2012-06-23_17-43-33_581.jpg
    84.6 KB · Views: 228
Joined
Sep 24, 2007
Messages
1,064
Reaction score
3
The fireplace needed one final touch so I installed a border around it as you can see here. It came out nice.
 

Attachments

  • 2013-02-09_20-12-16_104.jpg
    2013-02-09_20-12-16_104.jpg
    42.6 KB · Views: 198
Joined
Sep 24, 2007
Messages
1,064
Reaction score
3
The kitchen has been my largest task lately. I gutted the kitchen almost entirely so I could start over. The cabinets were disassembled, painted dark on the inside and cream on the outside, and then reassembled. I used a neat trim to space the cabinets from the ceiling. Also, the florescent lighting was removed completely and I fixed the drywall in the overhead area, applied texture, painted, and installed these very cool flexible track lights. I?m very happy with the way they came out. I installed ?? plywood for stability and height for the granite countertops that are going in. I also bought a black granite Pegasus kitchen sink that will be undermounted on the granite countertops. I had to use a router to cut a void where the sink can sit into the plywood so that the counter will rest flush where it meets the sink. I am doing the granite myself also with a wet circular saw and a straight edge. So far the cuts are coming out much nicer than even the factory cuts in the granite. The true test will come when I have to join the pieces together. We?ll see how nice and straight the cuts are then. So far, two pieces done. Several to go.
 

Attachments

  • IMG_20130421_212213_374.jpg
    IMG_20130421_212213_374.jpg
    28.7 KB · Views: 187
  • IMG_20130403_164012_571.jpg
    IMG_20130403_164012_571.jpg
    28.7 KB · Views: 194
  • IMG_20130403_164019_896.jpg
    IMG_20130403_164019_896.jpg
    25.1 KB · Views: 196
  • IMG_20130403_164027_734.jpg
    IMG_20130403_164027_734.jpg
    34.5 KB · Views: 205
  • IMG_20130406_111850_011.jpg
    IMG_20130406_111850_011.jpg
    15 KB · Views: 191
  • IMG_20130410_175652_171.jpg
    IMG_20130410_175652_171.jpg
    28.5 KB · Views: 210
  • IMG_20130410_175703_775.jpg
    IMG_20130410_175703_775.jpg
    33 KB · Views: 196
  • IMG_20130410_202523_827.jpg
    IMG_20130410_202523_827.jpg
    30.7 KB · Views: 201
  • IMG_20130410_213643_429.jpg
    IMG_20130410_213643_429.jpg
    36.5 KB · Views: 200
  • IMG_20130413_182436_039.jpg
    IMG_20130413_182436_039.jpg
    20.8 KB · Views: 190
  • IMG_20130413_182448_373.jpg
    IMG_20130413_182448_373.jpg
    26.4 KB · Views: 181
  • IMG_20130413_182452_336.jpg
    IMG_20130413_182452_336.jpg
    26.1 KB · Views: 201
  • IMG_20130417_193614_332.jpg
    IMG_20130417_193614_332.jpg
    20.7 KB · Views: 199
  • IMG_20130418_173455_199.jpg
    IMG_20130418_173455_199.jpg
    37.4 KB · Views: 190
  • IMG_20130420_100155_359.jpg
    IMG_20130420_100155_359.jpg
    32.5 KB · Views: 204
Joined
Sep 24, 2007
Messages
1,064
Reaction score
3
Pix
 

Attachments

  • IMG_20130421_181446_787.jpg
    IMG_20130421_181446_787.jpg
    33.3 KB · Views: 199
  • IMG_20130420_175305_967.jpg
    IMG_20130420_175305_967.jpg
    25.2 KB · Views: 199
  • IMG_20130421_180221_613.jpg
    IMG_20130421_180221_613.jpg
    25.2 KB · Views: 193
Joined
Sep 24, 2007
Messages
1,064
Reaction score
3
Last night I completed the south side of the kitchen counter and the island piece. The picture shows the seam I created. I haven't leveled the pieces or filled the seam yet which is why it is still so visible but I think it came out perfect for having never done granite before.
 

Attachments

  • IMG_20130422_211538_001.jpg
    IMG_20130422_211538_001.jpg
    18.6 KB · Views: 191
  • IMG_20130422_211208_797.jpg
    IMG_20130422_211208_797.jpg
    32.6 KB · Views: 197
  • IMG_20130422_211403_671.jpg
    IMG_20130422_211403_671.jpg
    25.9 KB · Views: 188

kevnmcd

Well-Known Member
Joined
Feb 20, 2008
Messages
1,930
Reaction score
476
Damn! That is some impressive work for never doing granite before. Great job.
 
Joined
Sep 24, 2007
Messages
1,064
Reaction score
3
I needed a break from granite for a day so since the water is out of the pool for other reasons, I decided to take care of the calcium ring around the rim of the pool due to lack of maintenance from the previous owner. I checked and local companies want $500 to bead blast the calcium off. I have all the equipment so I decided to tackle it myself. I used glass beads for blast media and went to work. This pic shows the difference while work in progress. It's much better but not perfect. I did read that if I get most of the calcium off, and maintain the pool properly, the rest will flake off in time. Here's hoping.
 

Attachments

  • IMG_20130424_175329_222.jpg
    IMG_20130424_175329_222.jpg
    52.4 KB · Views: 160
Joined
Sep 24, 2007
Messages
1,064
Reaction score
3
More granite complete and cabinet pulls installed. Next step is to cut the sink out.
 

Attachments

  • IMG_20130428_213837_590.jpg
    IMG_20130428_213837_590.jpg
    31.2 KB · Views: 162
Joined
Sep 24, 2007
Messages
1,064
Reaction score
3
Here is the final result of the pool calcium ring removal. It came out very nice and looks so much better than it did!
 

Attachments

  • IMG_20130510_192441_295.jpg
    IMG_20130510_192441_295.jpg
    37.3 KB · Views: 172
Joined
Sep 24, 2007
Messages
1,064
Reaction score
3
These pics show the nearly completed countertop. I just have to epoxy the joints and add backsplash and it's done. You can see the completed sink and a couple installed appliances in these pics.
 

Attachments

  • IMG_20130510_191727_960.jpg
    IMG_20130510_191727_960.jpg
    26.2 KB · Views: 170
  • IMG_20130510_192356_811.jpg
    IMG_20130510_192356_811.jpg
    28.3 KB · Views: 185
  • IMG_20130510_191705_623.jpg
    IMG_20130510_191705_623.jpg
    26.8 KB · Views: 173
Joined
Sep 24, 2007
Messages
1,064
Reaction score
3
I decided to go with a Jacuzzi bathtub in the master bath since I got a killer deal on a brand new setup recently. I couldn't pass it up. I removed the old tub, ran GFI wiring to power the Jacuzzi motor, and redid the overflow and drain plumbing to fit the new tub. As of now, the tub is installed and tested working. Tonight I am going to redo the faucet portion and begin to prep for the travertine I bought for the bath walls.
 

Attachments

  • IMG_20130512_182059_477.jpg
    IMG_20130512_182059_477.jpg
    23.8 KB · Views: 168
  • IMG_20130510_191454_551 (1).jpg
    IMG_20130510_191454_551 (1).jpg
    26.4 KB · Views: 160
  • IMG_20130510_191521_973.jpg
    IMG_20130510_191521_973.jpg
    29.4 KB · Views: 150
  • IMG_20130511_183007_601.jpg
    IMG_20130511_183007_601.jpg
    42.1 KB · Views: 166
Joined
Sep 24, 2007
Messages
1,064
Reaction score
3
Here are the shower pics after I completed the tile. It still needs grout and some finishing touches but you get the idea. I also packed the walls with insulation before installing the hardybacker help keep the noise from the jacuzzi pump down in the livingroom. I had to relocate the plumbing valve because this tub is so much taller than the old one. New trim is on it's way.
 

Attachments

  • IMG_20130523_215120_749.jpg
    IMG_20130523_215120_749.jpg
    47.9 KB · Views: 167
  • IMG_20130523_215057_936.jpg
    IMG_20130523_215057_936.jpg
    20.3 KB · Views: 157
Joined
Sep 24, 2007
Messages
1,064
Reaction score
3
Completed shower / tub
 

Attachments

  • IMG_20130611_185446_266.jpg
    IMG_20130611_185446_266.jpg
    23.1 KB · Views: 161
  • IMG_20130611_185435_720.jpg
    IMG_20130611_185435_720.jpg
    28.4 KB · Views: 150

RUNNINHOTRACING163.1

Well-Known Member
Joined
Jan 24, 2012
Messages
2,819
Reaction score
19
The kitchen has been my largest task lately. I gutted the kitchen almost entirely so I could start over. The cabinets were disassembled, painted dark on the inside and cream on the outside, and then reassembled. I used a neat trim to space the cabinets from the ceiling. Also, the florescent lighting was removed completely and I fixed the drywall in the overhead area, applied texture, painted, and installed these very cool flexible track lights. I?m very happy with the way they came out. I installed ?? plywood for stability and height for the granite countertops that are going in. I also bought a black granite Pegasus kitchen sink that will be undermounted on the granite countertops. I had to use a router to cut a void where the sink can sit into the plywood so that the counter will rest flush where it meets the sink. I am doing the granite myself also with a wet circular saw and a straight edge. So far the cuts are coming out much nicer than even the factory cuts in the granite. The true test will come when I have to join the pieces together. We?ll see how nice and straight the cuts are then. So far, two pieces done. Several to go.

Looks good ,but why go thru all that and Granite tops and keep the Home Depot cabinetry ?


http://www.ebay.com/itm/LED-BOAT-DR...ain_0&var=&hash=item2c6a87c5ea#ht_9068wt_1117

http://www.ebay.com/itm/BLUE-4-LED-...ltDomain_0&hash=item2c6eb221f4#ht_2799wt_1117


ROCK ON !!!!!!!!!!!!!!!
ITS A SKATER NATION !!!!!!!!!!!!!!!!!!!!!!!!!!!!!!!!!!:champagne::champagne:
 
Joined
Sep 24, 2007
Messages
1,064
Reaction score
3
The countertops cost me very little and new cabinets would have been been way over budget so I refinished the old ones.

In short, they were FREE

Looks good ,but why go thru all that and Granite tops and keep the Home Depot cabinetry ?


http://www.ebay.com/itm/LED-BOAT-DR...ain_0&var=&hash=item2c6a87c5ea#ht_9068wt_1117

http://www.ebay.com/itm/BLUE-4-LED-...ltDomain_0&hash=item2c6eb221f4#ht_2799wt_1117


ROCK ON !!!!!!!!!!!!!!!
ITS A SKATER NATION !!!!!!!!!!!!!!!!!!!!!!!!!!!!!!!!!!:champagne::champagne:
 
Last edited:
Joined
Sep 24, 2007
Messages
1,064
Reaction score
3
I spent the weekend of the 4th fixing up the garage. I don't have any "in progress" pics before this point but you can see I added base boards, painted all walls and the ceiling, and added the garage floor epoxy coating. It came out great! I still have the door to paint and some misc things to do in the garage but the big stuff is done.
 

Attachments

  • IMG_20130707_183400_241.jpg
    IMG_20130707_183400_241.jpg
    17.5 KB · Views: 157
Top