WELCOME TO RIVER DAVES PLACE

SPECTRALEN's 20 Rebuild

SPECTRALEN

Well-Known Member
Joined
Jun 26, 2008
Messages
385
Reaction score
154
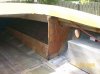
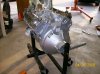
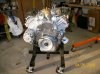
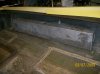
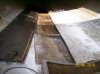
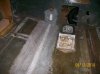
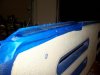
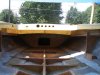
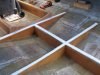
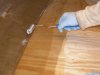
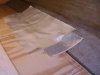
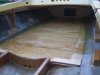
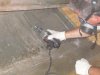
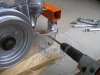
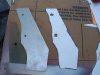
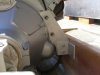
Well, I bought this boat from a storage lot in Pontiac Mi. about 6 years ago and I'm really starting to knock out all of the glass work that takes so much time.:rolleyes:
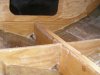
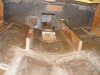
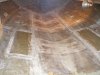
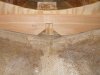
I can show some pics of how I got to here, but I've got some way to go.:D
 

Attachments

  • 100_0078.jpg
    100_0078.jpg
    126.8 KB · Views: 1,304
  • 100_0085.jpg
    100_0085.jpg
    64.7 KB · Views: 1,283
  • 100_0086.jpg
    100_0086.jpg
    54 KB · Views: 1,282
  • 100_0087.jpg
    100_0087.jpg
    29.4 KB · Views: 1,279
  • 100_0134.jpg
    100_0134.jpg
    55.4 KB · Views: 1,276

SPECTRALEN

Well-Known Member
Joined
Jun 26, 2008
Messages
385
Reaction score
154
It's off to get a custom bent stainless rubrail.
 

Attachments

  • 100_0140.jpg
    100_0140.jpg
    55.6 KB · Views: 1,165
  • 100_0133.jpg
    100_0133.jpg
    55.8 KB · Views: 1,173
  • 100_0131.jpg
    100_0131.jpg
    89.5 KB · Views: 1,175

SPECTRALEN

Well-Known Member
Joined
Jun 26, 2008
Messages
385
Reaction score
154
Built a dolly so I can roll it back and fourth into the garage a little easier.
 

Attachments

  • 100_0204.jpg
    100_0204.jpg
    52.8 KB · Views: 1,148
  • 100_0210.jpg
    100_0210.jpg
    68.6 KB · Views: 1,139

SPECTRALEN

Well-Known Member
Joined
Jun 26, 2008
Messages
385
Reaction score
154
Did things a little out of order. I rebuilt the 460 about 2 years ago and can start it on a special stand I have.
Wasn't sure how that stand was going to hold, so I left the picker in place . Didn't even come close to flipping.
She's a runner. Mostly stock with aluminum intake and breakerless ignition.
 

Attachments

  • 100_0107.jpg
    100_0107.jpg
    94.1 KB · Views: 1,121
  • 100_0097.jpg
    100_0097.jpg
    85.8 KB · Views: 1,109
  • 100_0004.jpg
    100_0004.jpg
    86.1 KB · Views: 1,118
  • 100_0003.jpg
    100_0003.jpg
    73.2 KB · Views: 1,132
  • 100_0002.jpg
    100_0002.jpg
    77.5 KB · Views: 1,162
  • 100_0001.jpg
    100_0001.jpg
    73.2 KB · Views: 1,166

SPECTRALEN

Well-Known Member
Joined
Jun 26, 2008
Messages
385
Reaction score
154
Picked up some braided hose on craigslist cheap and made some clamp covers out of some old aluminum tent poles. A whole cheaper than AN fittings and looks better than just the hose clamps.

You can also see in the first pic the little engine pulls for a chain hook up that are bolted to the heads that I fabbed up. Nothing too trick, just makes it easier.
 

Attachments

  • 100_0350.jpg
    100_0350.jpg
    60.3 KB · Views: 1,316
  • 100_0349.jpg
    100_0349.jpg
    91.6 KB · Views: 1,084
  • 100_0347.jpg
    100_0347.jpg
    59.2 KB · Views: 1,071
  • 100_0344.jpg
    100_0344.jpg
    77 KB · Views: 1,073
  • 100_0341.jpg
    100_0341.jpg
    51.8 KB · Views: 1,075
  • 100_0340.jpg
    100_0340.jpg
    68.2 KB · Views: 1,075
  • 100_0337.jpg
    100_0337.jpg
    83.4 KB · Views: 1,084

SPECTRALEN

Well-Known Member
Joined
Jun 26, 2008
Messages
385
Reaction score
154
Cut out the old fiberglass fuel tanks. Picked up a pair of 20 gal. aluminums on ebay for $147.00 shipped. Had to raise them to fit them under the gunnels.
 

Attachments

  • 100_0482.jpg
    100_0482.jpg
    60.5 KB · Views: 1,054
  • 100_0483.jpg
    100_0483.jpg
    60.2 KB · Views: 1,049
  • 100_1096.jpg
    100_1096.jpg
    85.3 KB · Views: 1,050
  • 100_1097.jpg
    100_1097.jpg
    60.2 KB · Views: 1,050
  • 100_1098.jpg
    100_1098.jpg
    61.8 KB · Views: 1,174

SPECTRALEN

Well-Known Member
Joined
Jun 26, 2008
Messages
385
Reaction score
154
Cut the front bulhead and the floor out. Found about 3 gallons of water underneath.
 

Attachments

  • 101_0101.jpg
    101_0101.jpg
    66.2 KB · Views: 1,033
  • 101_0099.jpg
    101_0099.jpg
    119.4 KB · Views: 1,038
  • 101_0100.jpg
    101_0100.jpg
    60.7 KB · Views: 1,051

SPECTRALEN

Well-Known Member
Joined
Jun 26, 2008
Messages
385
Reaction score
154
Made up some jigs to hold in place the stringers. Did one at a time.
 

Attachments

  • 101_0159.jpg
    101_0159.jpg
    75.1 KB · Views: 1,035
  • 101_0171.jpg
    101_0171.jpg
    70.6 KB · Views: 1,028
  • 101_0172.jpg
    101_0172.jpg
    71.8 KB · Views: 1,034
  • 101_0173.jpg
    101_0173.jpg
    70.4 KB · Views: 1,032
  • 101_0189.jpg
    101_0189.jpg
    75.3 KB · Views: 1,033

SPECTRALEN

Well-Known Member
Joined
Jun 26, 2008
Messages
385
Reaction score
154
Rebuilt the swim step with a one piece of plywood. This thing weighs a ton.
 

Attachments

  • 100_1118.jpg
    100_1118.jpg
    112.3 KB · Views: 1,030
  • 100_1117.jpg
    100_1117.jpg
    101.5 KB · Views: 1,030
  • 100_0923.jpg
    100_0923.jpg
    50.4 KB · Views: 1,025
  • 100_0922.jpg
    100_0922.jpg
    96.6 KB · Views: 1,008
  • 100_0921.jpg
    100_0921.jpg
    101.9 KB · Views: 1,009
  • 100_0920.jpg
    100_0920.jpg
    67.1 KB · Views: 994
  • 100_0919.jpg
    100_0919.jpg
    60.3 KB · Views: 999

SPECTRALEN

Well-Known Member
Joined
Jun 26, 2008
Messages
385
Reaction score
154
Right now I have the engine stringers in, the fuel tank mounts in, the front bulkhead and center stringer with the side braces all in.

After I dial these floor supports in and make them pretty level, What can I use to adhere the plwood floor to the stringers? :hmmI'm going to matt the underside and mask off the strips that will make contact with the stringers so I get a good bond for the wood.
 

Attachments

  • P7170014.jpg
    P7170014.jpg
    69.9 KB · Views: 991
  • P7170013.jpg
    P7170013.jpg
    53 KB · Views: 997
  • P7170012.jpg
    P7170012.jpg
    78.9 KB · Views: 998
  • P7170011.jpg
    P7170011.jpg
    86.8 KB · Views: 997

DtB

Well-Known Member
Joined
Oct 4, 2007
Messages
1,190
Reaction score
120
Quality work! Keep the pics coming
 

Community

Well-Known Member
Joined
Dec 20, 2007
Messages
2,180
Reaction score
326
I am not a pro but what you are doing looks real nice!
 

SPECTRALEN

Well-Known Member
Joined
Jun 26, 2008
Messages
385
Reaction score
154
I am not a pro but what you are doing looks real nice!

I am by no meens a pro either, but the first pieces I did don't look anything like the later.:D Which meens I must be getting better.:cool:
 

alohajeff

Well-Known Member
Joined
Jan 28, 2009
Messages
1,071
Reaction score
449
It's bitchin' to see another Spectra being saved instead of scrapped!

Aloha
 

TeamGreene

Well-Known Member
Joined
Dec 19, 2007
Messages
4,598
Reaction score
9,242
Great thread! Nice to see another one restored. :thumbsup
 

spectras only

Well-Known Member
Joined
Sep 20, 2007
Messages
13,089
Reaction score
12,868
Spectralen, I did a similar job on my 76 20' , going full keel with cross frames, instead of box and center keel like yours. Your boat will be rock solid on any water.:thumbsup. I used Sikaflex 291 to bond the floor to the stringers and cross frames.
 
Last edited:

74 spectra20 v-drive

74 spectra20 v-drive
Joined
Nov 27, 2008
Messages
2,043
Reaction score
2,888
Lenny. looks great! I think you and I are tied for the longest rebuild on this site though... keep up the good work.
 

Skee

Unknown Member
Joined
Jul 20, 2008
Messages
2,348
Reaction score
70
Hoping to start mine at the end of the season... :D :thumbsup
 

SPECTRALEN

Well-Known Member
Joined
Jun 26, 2008
Messages
385
Reaction score
154
Lenny. looks great! I think you and I are tied for the longest rebuild on this site though... keep up the good work.
Thanks Cliff. I've been pretty much useing all your advice and trying not to work on such a big area at a time. Hopefully the floor will be down within a week, then I'll be installing the engine to figure the mounts. Also want to get started on interior frames. I really like the interior in LIGHT THIS CANDLE. I want to try and clone the hatch and jump seats and have the buckets a little more of a rounded look.
 

Attachments

  • pic 4.jpg
    pic 4.jpg
    18.8 KB · Views: 569

SPECTRALEN

Well-Known Member
Joined
Jun 26, 2008
Messages
385
Reaction score
154
Making a couple of shims to flatten these supports a little better. Glassing them in and making some patterns. I pretty much make patterns for everything, all my matt and cloth, and plywood. It takes a little longer sometimes but it makes for a better fit.:p
 

Attachments

  • P7200028.jpg
    P7200028.jpg
    56.8 KB · Views: 600
  • P7200023.jpg
    P7200023.jpg
    65.3 KB · Views: 597
  • P7200030.jpg
    P7200030.jpg
    56.1 KB · Views: 601
  • P7200024.jpg
    P7200024.jpg
    26.4 KB · Views: 598

SPECTRALEN

Well-Known Member
Joined
Jun 26, 2008
Messages
385
Reaction score
154
Used packging tape to put the 2 fiberboards together and get a good pattern. Also, the 23 grit discs like to wear out mostly on the edges. I take them and fold them and they have a nice handle to hand sand with.:cool:
They still need to be finish sanding so if the one near to the engine box looks tight, soon it won't be. I'm keeping about a 1/4 to 1/2 inch gap along the sides and tabbing with biaxle cloth about 8 inches wide, 4 inches each side.;)
The plywood is 19/32 BC and is very sturdy, even before the glass.:thumbsup
 

Attachments

  • P7210035.jpg
    P7210035.jpg
    65.4 KB · Views: 602
  • P7210034.jpg
    P7210034.jpg
    49.6 KB · Views: 597
  • P7210032.jpg
    P7210032.jpg
    53.7 KB · Views: 603
  • P7210031.jpg
    P7210031.jpg
    49.2 KB · Views: 603
  • P7200025.jpg
    P7200025.jpg
    39.8 KB · Views: 597

SPECTRALEN

Well-Known Member
Joined
Jun 26, 2008
Messages
385
Reaction score
154
This bottom side to the front piece is taking about a 1/2 galloon of resin to wet out. I can't be sure but I have about 7 or 8 gallons in already. You got to wear a respirator for sure, even in the outdoors.
Another thing that helps me is saving these glass juice bottles. They make it alot easier for pouring and measuring. Also, I save any thicker plastic food containers like butter, sour cream, chip dip, etc.. They are sturdy and don't melt like the cheap cups I bought at the dollar store.
Had to run a 2 x 4 on the mat to keep the wind from taking it.
 

Attachments

  • P7170015.jpg
    P7170015.jpg
    64.3 KB · Views: 583
  • P7220041.jpg
    P7220041.jpg
    65.9 KB · Views: 570
  • P7220049.jpg
    P7220049.jpg
    66.2 KB · Views: 569
  • P7220047.jpg
    P7220047.jpg
    92.3 KB · Views: 580

74 spectra20 v-drive

74 spectra20 v-drive
Joined
Nov 27, 2008
Messages
2,043
Reaction score
2,888
Hey lenny... try a 4" brush works great for wetting glass. I watch my buddy Mark do this at the shop and it's effortless...he swears by using the 4" brush and he is right, much easier. Have you looked at getting the resin in 5 gallon cans, usually about the cost of 4 singles gallons. I figured I share this with you once you are almost done:D

Also you can get away with just using cloth on the bottom of the floors, will last and uses less resin.

Your comment on the fumes and using a resporator made me laugh, when I was glassing the top deck back in and doing my bulk heads I didn't wear one and man was I hurting... I guess that means I don't work fast enough. I watched Mark over at B&K do the bottom front end of a Cracker Box last week, he layed it up in two sections 1 layer mat and cloth and finished in about the amount of time it takes me to do a patch, I must like smelling the stuff.

Looks good!!
 
Last edited:

SPECTRALEN

Well-Known Member
Joined
Jun 26, 2008
Messages
385
Reaction score
154
Hey lenny... try a 4" brush works great for wetting glass. I watch my buddy Mark do this at the shop and it's effortless...he swears by using the 4" brush and he is right, much easier. Have you looked at getting the resin in 5 gallon cans, usually about the cost of 4 singles gallons. I figured I share this with you once you are almost done:D

Also you can get away with just using cloth on the bottom of the floors, will last and uses less resin.

Your comment on the fumes and using a resporator made me laugh, when I was glassing the top deck back in and doing my bulk heads I didn't wear one and man was I hurting... I guess that means I don't work fast enough. I watched Mark over at B&K do the bottom front end of a Cracker Box last week, he layed it up in two sections 1 layer mat and cloth and finished in about the amount of time it takes me to do a patch, I must like smelling the stuff.

Looks good!!

I'm definately going to try those 4 in. brushes. Yeah, I was going to go with the 5 gallon but then I was going to make up all the wood and farm out all the glass over the winter, then I just started doing it myself and now I don't have a whole lot more to go.;)
I planned on using the matt on the bottom and a heavy cloth on the top. :hmm Is this not a good idea?
 

74 spectra20 v-drive

74 spectra20 v-drive
Joined
Nov 27, 2008
Messages
2,043
Reaction score
2,888
Looks like you have 3/4 or 1" floors, you should be plenty thick and this process is really just to seal them and keep from rotting away. The cloth helps keep the resin from cracking. Remember that the strength comes from the Mat, the cloth doesn't add strength. I used 6oz cloth and 2 oz matt for all construction, most of the time we used two layers of matt.
 

SPECTRALEN

Well-Known Member
Joined
Jun 26, 2008
Messages
385
Reaction score
154
The floors are 19/32 BC plywood, so just under 5/8. The span is no longer than 24 inches so they're pretty good.

I just found some more pics of the stringer build.
 

Attachments

  • P4220177.jpg
    P4220177.jpg
    85.7 KB · Views: 551
  • P4220178.jpg
    P4220178.jpg
    76.7 KB · Views: 547
  • P4220179.jpg
    P4220179.jpg
    79.7 KB · Views: 554
  • P4220180.jpg
    P4220180.jpg
    59.9 KB · Views: 562
  • P4220181.jpg
    P4220181.jpg
    77.3 KB · Views: 536
  • P4220186.jpg
    P4220186.jpg
    62.2 KB · Views: 543
  • P4220185.jpg
    P4220185.jpg
    60.9 KB · Views: 552
  • P4220184.jpg
    P4220184.jpg
    66.7 KB · Views: 546
  • P4220183.jpg
    P4220183.jpg
    77.7 KB · Views: 539
  • P4220182.jpg
    P4220182.jpg
    68.5 KB · Views: 545

SPECTRALEN

Well-Known Member
Joined
Jun 26, 2008
Messages
385
Reaction score
154
Couple more. I used biaxle on all the inside corners and wrapped over them with matt and biaxle.

The braces were glassed down with chopped matt. If there was any gaps, I filled with some thickened resin.
Also, doing all work in driveway, running a fan helps get rid of the fumes that would have been pushed back in the garage with the boat.:D
 

Attachments

  • P7020321.jpg
    P7020321.jpg
    64.5 KB · Views: 532
  • P7020322.jpg
    P7020322.jpg
    52.7 KB · Views: 535

specrocz

77 Spectra 24 v-drive
Joined
Sep 23, 2008
Messages
115
Reaction score
40
Looking good so far. Did you make a floor support alongside the motor stringers? The design looks like a spine and ribs and should be very strong.:boobeyes:
 

SPECTRALEN

Well-Known Member
Joined
Jun 26, 2008
Messages
385
Reaction score
154
Thanks Bro.
I think I'm going to put in the floors that go next to the engine after the motor mounts are drilled. I'm going to have some small gaps between the stringers and the area of the floor where a wrench can hold the bolts for the mounts.:cool:
 

RiverDave

In it to win it
Joined
Sep 13, 2007
Messages
123,369
Reaction score
151,174
Can I ask why you didn't just run 4 stringers at that point?

Looks bitchen the way you have it!

RD
 

SPECTRALEN

Well-Known Member
Joined
Jun 26, 2008
Messages
385
Reaction score
154
Can I ask why you didn't just run 4 stringers at that point?

Looks bitchen the way you have it!

RD

This is my second 20 Spectra jet. I kind of like how you don't stand so tall in the boat with the floor being so low, but the problem with the low floor is that it's not level.:grumble:
I was going to run full length engine stringers and just cut them down to the right heighth forward of the engine box. Then I saw this guy online doing this set up and thought it looked pretty cool. Lot of work with pattern making.:grumble:
It might have been easier to do the full lenghth dealio instead? Oh well.:rolleyes:
 

SPECTRALEN

Well-Known Member
Joined
Jun 26, 2008
Messages
385
Reaction score
154
Got the floor all glued and screwed down. Had an issue with the gap on the front piece to the side of the hull. It looked too tight so I did some surgery and carefully removed some material.
 

Attachments

  • P7250067.jpg
    P7250067.jpg
    65.4 KB · Views: 626
  • P7250065.jpg
    P7250065.jpg
    47.1 KB · Views: 621
Last edited:

SPECTRALEN

Well-Known Member
Joined
Jun 26, 2008
Messages
385
Reaction score
154
Everything getting glassed gets a fresh grinding, sanding and vaccumn before wetting. I'm constantly walking all over stuff that may get resined so it seems like the right thing to do. Also, had to lay up some extra mat to fill in the low area of the stringer. The middle support and center stringer were a 1/8 to a 1/4 in. low so I wetted out 5 pieces of mat and let them set for a bit till they got firm and then wetted the higher areas, slapped her down real caregul and screwed in the predrilled holes that were mocked up earlier.
 

Attachments

  • P7250069.jpg
    P7250069.jpg
    79.4 KB · Views: 639
  • P7260073.jpg
    P7260073.jpg
    85.5 KB · Views: 623
  • P7260075.jpg
    P7260075.jpg
    83.7 KB · Views: 631
  • P7260076.jpg
    P7260076.jpg
    81.2 KB · Views: 620

SPECTRALEN

Well-Known Member
Joined
Jun 26, 2008
Messages
385
Reaction score
154
The floor is down and I'm tabbing with an 8 in. wide biaxle mat/cloth, and topping that with a 20 oz. cloth that is 12 in. wide. I'm done with the left side and hoping to get the right side and then the center section of the floor this week .:cool:
 

Attachments

  • P7300110.jpg
    P7300110.jpg
    52.5 KB · Views: 586
  • P7300107.jpg
    P7300107.jpg
    52.9 KB · Views: 583
  • P7300104.jpg
    P7300104.jpg
    44.8 KB · Views: 580
  • P7300111.jpg
    P7300111.jpg
    60.5 KB · Views: 578
  • P7260081.jpg
    P7260081.jpg
    59.7 KB · Views: 593
  • P7260083.jpg
    P7260083.jpg
    55.1 KB · Views: 580

SPECTRALEN

Well-Known Member
Joined
Jun 26, 2008
Messages
385
Reaction score
154
Thanks for all the compliments.

I got the main floor area all clothed and just need to put in the side pieces next to the engine, then I'll tie it all in. After all the interior glass is done, I'll go back and hit all the high spots with the grinder and put un a finish coat.
 

Attachments

  • P8030112.jpg
    P8030112.jpg
    63 KB · Views: 486
  • P8030113.jpg
    P8030113.jpg
    58.9 KB · Views: 473

SPECTRALEN

Well-Known Member
Joined
Jun 26, 2008
Messages
385
Reaction score
154
I'm starting to clean up where the carpet is going to go and grinding makes so much dust and I don't want to take out material if i'm not going to be re-fiberglassing over that area, so I tried using a wire wheel on a drill to remove the old dried up glue and it worked pretty good.:thumbsup
 

Attachments

  • P8040118.jpg
    P8040118.jpg
    68.3 KB · Views: 467
  • P8040116.jpg
    P8040116.jpg
    50.2 KB · Views: 472

SPECTRALEN

Well-Known Member
Joined
Jun 26, 2008
Messages
385
Reaction score
154
Drill baby drill.
Started out with the Alt. and exhaust still on just to see how she was looking, but that got old real fast and had to strip it down a bit.
 

Attachments

  • P8200191.jpg
    P8200191.jpg
    107.3 KB · Views: 515
  • P8200192.jpg
    P8200192.jpg
    62.4 KB · Views: 513
  • P8200193.jpg
    P8200193.jpg
    88.4 KB · Views: 510
  • P8200194.jpg
    P8200194.jpg
    77.3 KB · Views: 498
  • P8200197.jpg
    P8200197.jpg
    98 KB · Views: 503

SPECTRALEN

Well-Known Member
Joined
Jun 26, 2008
Messages
385
Reaction score
154
Hope the angle is ok so there's no vibration.
 

Attachments

  • P8200213.jpg
    P8200213.jpg
    63.1 KB · Views: 489
  • P8200209.jpg
    P8200209.jpg
    61.3 KB · Views: 492
  • P8200205.jpg
    P8200205.jpg
    56.4 KB · Views: 483
  • P8200204.jpg
    P8200204.jpg
    85.1 KB · Views: 489
  • P8200200.jpg
    P8200200.jpg
    79.2 KB · Views: 496
Last edited:

SPECTRALEN

Well-Known Member
Joined
Jun 26, 2008
Messages
385
Reaction score
154
Made some spacers for the rear mounts, which makes this system a 5 point mount. I wanted to keep this bellhousing but also wanted to secure the back end a little more.
 

Attachments

  • P8260232.jpg
    P8260232.jpg
    81.4 KB · Views: 477
  • P8210218.jpg
    P8210218.jpg
    90.1 KB · Views: 472
  • P8210217.jpg
    P8210217.jpg
    59.8 KB · Views: 482
  • P8210216.jpg
    P8210216.jpg
    71.1 KB · Views: 468
  • P8210214.jpg
    P8210214.jpg
    69.6 KB · Views: 480

SPECTRALEN

Well-Known Member
Joined
Jun 26, 2008
Messages
385
Reaction score
154
Making the supports.
 

Attachments

  • P8260240.jpg
    P8260240.jpg
    83.2 KB · Views: 480
  • P8260237.jpg
    P8260237.jpg
    58.4 KB · Views: 467
  • P8260236.jpg
    P8260236.jpg
    54.6 KB · Views: 475
  • P8260235.jpg
    P8260235.jpg
    55.5 KB · Views: 477
  • P8260233.jpg
    P8260233.jpg
    63.3 KB · Views: 478

SPECTRALEN

Well-Known Member
Joined
Jun 26, 2008
Messages
385
Reaction score
154
pics
 

Attachments

  • P8270241.jpg
    P8270241.jpg
    63.9 KB · Views: 474
  • P8270242.jpg
    P8270242.jpg
    47.1 KB · Views: 472
  • P8270245.jpg
    P8270245.jpg
    71 KB · Views: 470

SPECTRALEN

Well-Known Member
Joined
Jun 26, 2008
Messages
385
Reaction score
154
Tossed the tanks in. They are next to be mounted.

Something about a BBF 7 ft. in the air, held by a harbor freight picker. Just saying.
 

Attachments

  • P8260239.jpg
    P8260239.jpg
    90.4 KB · Views: 486
  • P8260238.jpg
    P8260238.jpg
    67 KB · Views: 489
  • P8270244.jpg
    P8270244.jpg
    86.2 KB · Views: 491

ka0tyk

Warlock Performance Boats Merchandise Connections
Joined
Oct 4, 2010
Messages
9,030
Reaction score
11,389
chop the ends of those snails off and open em up to 4".
 

SPECTRALEN

Well-Known Member
Joined
Jun 26, 2008
Messages
385
Reaction score
154
I am thinking about it. I bought a brand new set of the stock tips, 2 7/8 in. from Tom @ jet boat performance. If he would let me trade em up and do an upgrade for the difference in the price, I'd probably pull the trigger.:cool:

As far as modifying the transom holes, will the stud holes dissappear with the 4 in. cut out?

Anyone know of any performance to come from the snail cut with tip swap?
 
Last edited:

ka0tyk

Warlock Performance Boats Merchandise Connections
Joined
Oct 4, 2010
Messages
9,030
Reaction score
11,389
I am thinking about it. I bought a brand new set of the stock tips, 2 7/8 in. from Tom @ jet boat performance. If he would let me trade em up and do an upgrade for the difference in the price, I'd probably pull the trigger.:cool:

As far as modifying the transom holes, will the stud holes dissappear with the 4 in. cut out?

Anyone know of any performance to come from the snail cut with tip swap?

when i chopped out my 3" trumpet tips for 4" transom rings with my exhaust it ended up cutting the mounting holes out.
 

74 spectra20 v-drive

74 spectra20 v-drive
Joined
Nov 27, 2008
Messages
2,043
Reaction score
2,888
Lenny, looks great but your motor is in back wards unless you are going to run a right hand drive gear box like a circle boat.. Oh I forgot it's a jet boat... Just kidding you, great job man looks like you are cranking it out man.
 
Top