I had a couple months ago been wondering where I had been losing drive oil. It would be ever so slightly down in the reservoir but never saw an obvious leak. Every time I head to the water weather it was yesterday or weeks I check all my oil levels.
OD1 and I were going to hit the Sag 2 weeks ago for a little day trip, he's treated me to time in his Hot Rod Schiada so it was def past due on my turn to be the Chaperone for the day in my Row Boat.
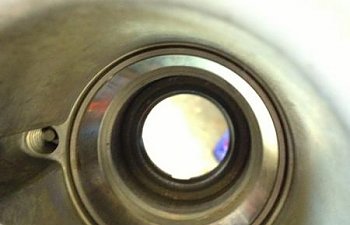
As I was getting everything ready I was going to change the prop... Get the prop off and the lower case is full of oil. Open the hatch and sure enough the reservoir was all but empty.
Hard to tell from the picture but it's full off oil in there and you can see the trail down the carrier.

So I call Paul tell him I've got an issue and that my boats broke. I'm no outdrive guru. So send OD1 a couple pictures and he advises me of what my problem is and says we can take his Boat out for the trip. Thx dude!
Call Nordic and talked to Mike Chandler these guys are just stellar over there always under promise and over deliver. He got me a seal kit roughly around $60 and it was to me the next day.
Finally got around to replacing the seal(s) today. I've never had one of these apart but I consider my self pretty mechanically inclined so why not ill take on the task. I have a old Merc book read through just to see what all is in there and what I was up against. I also asked OD1 if it was anything crazy but said it's not big deal just need a spanner wrench. Which for what ever reason I had, don't recall why I bought this but glad I had it.

After draining what oil was left in the drive I was able to get this job started.
Made sure I marked the ring and the housing then bent the little lock ring tab over and unscrewed the nut if you want to call it that while counting my turns so I know on re assembly.

Tab lock ring and nut.
I wasn't sure if I was going to be able to get the carrier out with my fingers but I built a little puller just in case like it showed in the book.

I was able to get it out by hand with no problem.


Looking at the prop shaft I noticed some pitting where the seal rides.


So I pulled the shaft out and cleaned it up the best I could with some emery cloth. (Hopefully it seals if not ill have to replace the shaft)


In the bottom after you get the carrier out there's a shim then a crush sleeve. I replaced the crush sleeve I don't know if that's standard or not.


Next I knocked the old seals (one for water and one for oil) out of the carrier. Now in the book it says install these back to back... Well in the carrier they where spaced apart. You can tell the water seal was leaking.

Water seal

Oil seal
Installing the new seals was no big deal. Cleaned up inside the carrier found a socket that fit the seal to drive it down and in stalled them.
Some put locktite on the outer diameter of the seals.. some don't, I did. I also ran the seals up back to back like it said in the book. I'm not sure what the logic is behind to this as to spaced to back to back???


Carrier is ready to go back in now. Put a light ring of grease where the orange O-ring sits on the bottom of the carrier and light coat on the inner diameter of the seals.
Re installed the output shaft. The shaft just sits there when you have the carrier out. You don't have to remove it to do this job, I only removed it to clean up those imperfections that you saw above.
The carrier slid right back on no force really needed just a slight push with my thumbs and it was all back in.

Next is the lock ring or tab washer whatever you want to call it. It'll only go in one way. Then the nut.
As I was tightening the nut I could feel the crush sleeve as I went. Tightened the nut exactly the same amount of turn as when I did assembled it and back to the marks I had made. Then bent my tab ear back over.


I think this is something anyone here can complete on a weekend given some basic tools and knowing someone with the spanner wrench to barrow.")
p.s sorry for any spelling and grammar errors this was written on my phone.
Sent from my iPhone using Tapatalk
OD1 and I were going to hit the Sag 2 weeks ago for a little day trip, he's treated me to time in his Hot Rod Schiada so it was def past due on my turn to be the Chaperone for the day in my Row Boat.
As I was getting everything ready I was going to change the prop... Get the prop off and the lower case is full of oil. Open the hatch and sure enough the reservoir was all but empty.
Hard to tell from the picture but it's full off oil in there and you can see the trail down the carrier.
So I call Paul tell him I've got an issue and that my boats broke. I'm no outdrive guru. So send OD1 a couple pictures and he advises me of what my problem is and says we can take his Boat out for the trip. Thx dude!
Call Nordic and talked to Mike Chandler these guys are just stellar over there always under promise and over deliver. He got me a seal kit roughly around $60 and it was to me the next day.
Finally got around to replacing the seal(s) today. I've never had one of these apart but I consider my self pretty mechanically inclined so why not ill take on the task. I have a old Merc book read through just to see what all is in there and what I was up against. I also asked OD1 if it was anything crazy but said it's not big deal just need a spanner wrench. Which for what ever reason I had, don't recall why I bought this but glad I had it.
After draining what oil was left in the drive I was able to get this job started.
Made sure I marked the ring and the housing then bent the little lock ring tab over and unscrewed the nut if you want to call it that while counting my turns so I know on re assembly.
Tab lock ring and nut.
I wasn't sure if I was going to be able to get the carrier out with my fingers but I built a little puller just in case like it showed in the book.
I was able to get it out by hand with no problem.
Looking at the prop shaft I noticed some pitting where the seal rides.
So I pulled the shaft out and cleaned it up the best I could with some emery cloth. (Hopefully it seals if not ill have to replace the shaft)
In the bottom after you get the carrier out there's a shim then a crush sleeve. I replaced the crush sleeve I don't know if that's standard or not.
Next I knocked the old seals (one for water and one for oil) out of the carrier. Now in the book it says install these back to back... Well in the carrier they where spaced apart. You can tell the water seal was leaking.
Water seal
Oil seal
Installing the new seals was no big deal. Cleaned up inside the carrier found a socket that fit the seal to drive it down and in stalled them.
Some put locktite on the outer diameter of the seals.. some don't, I did. I also ran the seals up back to back like it said in the book. I'm not sure what the logic is behind to this as to spaced to back to back???
Carrier is ready to go back in now. Put a light ring of grease where the orange O-ring sits on the bottom of the carrier and light coat on the inner diameter of the seals.
Re installed the output shaft. The shaft just sits there when you have the carrier out. You don't have to remove it to do this job, I only removed it to clean up those imperfections that you saw above.
The carrier slid right back on no force really needed just a slight push with my thumbs and it was all back in.
Next is the lock ring or tab washer whatever you want to call it. It'll only go in one way. Then the nut.
As I was tightening the nut I could feel the crush sleeve as I went. Tightened the nut exactly the same amount of turn as when I did assembled it and back to the marks I had made. Then bent my tab ear back over.
I think this is something anyone here can complete on a weekend given some basic tools and knowing someone with the spanner wrench to barrow.
p.s sorry for any spelling and grammar errors this was written on my phone.
Sent from my iPhone using Tapatalk