ChrisV
Well-Known Member
- Joined
- Nov 30, 2020
- Messages
- 2,958
- Reaction score
- 8,888
by any chance did you weigh the boat when you first got it?


I did not. I did however weigh the bare hull when I flipped it, she came in at 1500 lbs. That was before the topside gel and balsa floors were finished so maybe add another 30-40 lbs.by any chance did you weigh the boat when you first got it?
 Sure does look good though! You could always add some color over the powder coat in the areas where the tanks will be visible. Just a thought. As always, your work is impeccable Sir!
Thanks! I had the tanks built to the what I believe the original size was. They should be about 30 gallons each.badass work man! Did you build the tank with the same dimensions? I was thinking about making bigger tanks for my float. Would extend all the way to the dash. Not sure if thats bad for boats.
The bulkhead type is in some ways simpler, but the straps are by far a better method of mounting. Not only are the tanks supported in the middle with the straps, but the straps also add a ton of rigidity to the hull by tying the gunwale to the floor. This crates a lot of structure making the boat feel much more solid as its pounding through the wakeboard waves all summer long. The bulkheads for the tanks only go as high as the lower portion of the deck and allow for flex above that.You're right Lenman the bulkhead method would be a lot easier, but probably not nearly as cool!
Very true, the gunwales are super solid now.The bulkhead type is in some ways simpler, but the straps are by far a better method of mounting. Not only are the tanks supported in the middle with the straps, but the straps also add a ton of rigidity to the hull by tying the gunwale to the floor. This crates a lot of structure making the boat feel much more solid as its pounding through the wakeboard waves all summer long. The bulkheads for the tanks only go as high as the lower portion of the deck and allow for flex above that.

Wow thats fucking cool!Some more odds and ends.
View attachment 1087175
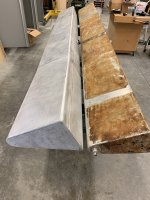
Installed the old rub rail after polishing it up nice and shiny. I had to do some (torch) adjusting at the corners to get the fit right, the discoloration polishes right off.
View attachment 1087178
View attachment 1087177 View attachment 1087179
There were a couple of short (15") sections of the original rub rail forward of the dash that looked crappy so I fixtured them up and welded them to the longer 12' sections along the side. Its a small detail but two fewer joints is better. once they were polished up you cant tell they were joined.
View attachment 1087181
View attachment 1087182
I want the boat to have full navigation lighting because once in a blue moon we get caught out after dark. I absolutely wasn't going to cut a big hole in the textured deck for one got those swing around nav lights so I had pretty much decided the solution was the old suction cup flashlight dealio. Then I found these cool very small led rub rail integrated nav lights from Taco Metals. There isn't much rub rail left after drilling the hole so it needed the two extra screws to keep the rub rail pulled tight. I am thinking this will be better than the flash light.
View attachment 1087185
So while the tanks were out at powder coat I decided I needed to install the cleats. This isn't going to be one of those trailer queen Schiada's. When I am not out embarrassing 100 mph jet boaters she will spend a fair amount of time tied to the side of our houseboat on Shasta. As much as it pained me to drill holes into the gunwales it really needed to done. I picked the smallest pop up cleat I could find and set about to locating them in spots that I hope maximize fucntionality. I hate it when the aft cleat is so far aft that the fender rolls around the transom and the hull smacks the dock or your buddies boat when you are rafted up. So I made sure the cleat location was a little more forward, about 12 inches from the transom corner.
View attachment 1087196 View attachment 1087197
Using hole saws on gel coat is kinda sketchy. Your can run them in reverse to get through the gel and help prevent stress cracks but they always seem to grab and tear the backside glass up a bunch so I decided to try a diamond hole saw like the granite and tile guys use. It worked great, super smooth and even cutting and a clean exit too.
View attachment 1087198
Nice and tidy.
View attachment 1087200
Remember when I said the tanks were out at powder coat and how I moved the cleats forward a bit? Well, I should have waited until the tanks were in to layout the cleats. They are about 1/2" too far forward and I had to trim the barrel off the bottom of the cleat to clear the tanks. Once the motor is in it will be really hard to see, until then it's the first thing I see when I look inside the hull.
View attachment 1087204 View attachment 1087205
Last chapter in this update. The IMCO power steering helm unit is a big ol chunk of cast iron and steel. When I hung it from the dash and the tilt column I could grab the steering wheel and it just didn't feel very solid. The weight of the helm catilevered behind the 3/4" plywood and glass dash was a little flexible. I could see crashing through some dock crusher wakes and that thing wobbling all over the damn place. Whoever rigged @SFV2RVR boat built a super cool billet support to address this issue so I did a similar thing with a little different style. It's three pieces of laser cut 1/8" stainless welded together and uses the helm itself as a stressed member. I kept it up high so it wasn't visible from in the boat. Solid as a rock now!
Next update should include a whole bunch of clear anodized aluminum stuff and a truckload of brand new stainless fasteners.
Thanks man, and thanks for the feedback on the elbows. As much as I am loath to take something back apart, I think it would look nicer and more consistent with fabricated sweeps. Time to order some more tube ends...Absolutely beautiful work, @lenmann. You’re on the home stretch and you can see the finish line.
Can I tempt you to consider swapping out your hard 90° fittings on your strainer inlets for sweepers? I’ve done a lot of work with this stuff and those flow about half of a sweeper, or even a hard 45° fitting. It’s unbelievable how much flow loss there is in a hard 90° fitting. Plus your welded and polished sweepers look absolutely bitchin!
Great work, sir! This stuff doesn’t come out that nice by accident. Your thoughts and planning are paying off.
Enjoy your camping!
 . I can't thank you enough for photo documenting and the time to share your journey here, not only is it awesome to look at and follow along but for some of us it gives motivation and a level to obtain on our own projects.......at least for me anyways! You are so close I don't know how you can walk away for a month at this point , but good on you enjoy your time with family and friends on your camping trip! Such a badass piece!!
 I lost a brand new race motor to a hard 90 oil fitting. It was a very painful lesson on flow.Thanks man, and thanks for the feedback on the elbows. As much as I am loath to take something back apart, I think it would look nicer and more consistent with fabricated sweeps. Time to order some more tube ends...
Oooo, tell me more about that.I lost a brand new race motor to a hard 90 oil fitting. It was a very painful lesson on flow.
FINALLY got the parts back from polish + anodize. It feels really good to be doing some final assembly work finally.
View attachment 1091366 View attachment 1091367
Cavitation assembly all put back together and plumbed the pick-ups. Really happy with how this came out.
View attachment 1091370 View attachment 1091371 View attachment 1091372
View attachment 1091373
Mounted up the engine rails, steering cylinder, cav actuator, bilge pump, oil coolers, fuel filters and strainers. Got started in on the plumbing. I didn't really like how the -16 hoses were lining up so I straitened things out by welding up some extended fittings. I had to pull back some of the protective film to mount up the strut braces, it's really exciting to see small pieces of the boat in final form.
View attachment 1091374
View attachment 1091375
View attachment 1091376 View attachment 1091377
Next up, I'm taking a month off to go camping and off-roading down Havasu way. After that more assembly, plumbing and wiring. Getting closer to the finish line!
Thanks, the 90* are from McMaster CarrWhere did you get your tight 90 degree radius tube segments from to fabricate your extended 90 degree fittings? Awesome job on the extended fittings, as well as everything else that you have done on your Schiada.

I used a forged 90* on the line going between the dry sump pump going into the block pressure side. A #10 or #12 if I remember right. Motor was making metal after dyno and we continued to monitor it. It lost a rod bearing in about 50 test miles. We caught it in time and only needed minor crank repair and 4 rods. Dry sump manufacturer gave me a good ass chewing for using that fitting. We now use std 90s and in critical spots the Australian sweep 90s. My Schiada still has some forged 90s and I haven’t had an issue there but will phase them out whenever possible. I took one off the steering in the race truck too and had a noticeable improvement. Now there are none on the race truck. Unfortunately not my only blown up race motor stories, some are way worse.Oooo, tell me more about that.
Are standard 90 * hose ends OK? Just avoid the forged tight 90*? Or are we talking about using the high flow AustralIan hose ends only?
Yeah, that was a bad day. Oh yeah, and a bad trip down the peninsulaI used a forged 90* on the line going between the dry sump pump going into the block pressure side. A #10 or #12 if I remember right. Motor was making metal after dyno and we continued to monitor it. It lost a rod bearing in about 50 test miles. We caught it in time and only needed minor crank repair and 4 rods. Dry sump manufacturer gave me a good ass chewing for using that fitting. We now use std 90s and in critical spots the Australian sweep 90s. My Schiada still has some forged 90s and I haven’t had an issue there but will phase them out whenever possible. I took one off the steering in the race truck too and had a noticeable improvement. Now there are none on the race truck. Unfortunately not my only blown up race motor stories, some are way worse.

Solid Work!!Yikes! Three plus months off without an update. I have been working on the boat, lots of little stuff, but haven't really felt like I had anything "meaty" enough for an update. Well lots of little stuff has added up.
First, some highlight pics from a couple of trips down Havasu way.
Robbie Gordon at the Desert Bar telling me I will hate my RZR Pro after a ride in the Speed Car. While I do like the Speed car, I'm gonna keep the RZR for now, cause well you know...bird in the hand and all that.
View attachment 1122268
Stumbled (Parker bar crawl) across a couple of Schiada's, in the wild no less.
View attachment 1122269 View attachment 1122271
And best of all were the two brand new RC's that @RiverDave had in the RDP Desert Storm display. The detail and innovation that Stan and Lee have built into these two boats is simply amazing.
View attachment 1122274 View attachment 1122275 View attachment 1122273 View attachment 1122272
So, fully inspired, back to my heap.
Finished up all the plumbing and wiring on the motor.
View attachment 1122348 View attachment 1122349 View attachment 1122350
View attachment 1122351 View attachment 1122352
Planned destination:
View attachment 1122353
Feels sketchy as all hell having all that weight hanging over the boat.
View attachment 1122354
Home sweet home, for hopefully the last time.
View attachment 1122355 View attachment 1122357
Next up: more plumbing, wiring, control cables, and lots of detail stuff. Getting closer.