Bowtiepower00
Well-Known Member
- Joined
- Apr 20, 2015
- Messages
- 2,365
- Reaction score
- 3,726
You work on some seriously cool shit. Props to your vast amount of knowledge and ability.


Thank you. I have been real lucky in learning the old car stuff from old guys when I was younger. I liked the stuff, but couldn't afford to pay someone. A lot of the guys that showed me stuff were in their 70s already, but were kind enough to share knowledge.. Over the years, I started amassing tools. Some new, some used...some weird. Over the past few years, I really started "upgrading"...they should outlast me now. The working on farm or heavy stuff, kind of came along by accident. The older stuff, maybe pre-2000, is kind of primitive, like old cars. Bigger wrenches and heavier parts, but same ol' thing.You work on some seriously cool shit. Props to your vast amount of knowledge and ability.
My "stockpile" is getting pretty low these days. I sold and hustled stuff over the years, starting in my teens. It was go-fast stuff then. In my 20's, I got into early cars, and started picking up early speed stuff. Over the years, I'd sell stuff to eat or make house payments. As the sun sets with the people who really know what this stuff is, it's doesn't bring the money it would have 10 years ago. Timing was right, and the parts I had helped me survive the last downturn. These parts are going for a good cause now, and this time I'm more prepared for a downturn...it all works out in the end. I'd rather this set of Zephyr gears go into a friends car, than collect dust on a shelf...they've been "resting" the past 80 years. Time they get a jobThat's an impressive inventory of "stuff" you have there, not many people that can pull those kind of parts off the shelf.
Endeavor to persevere...

is that 1.5" copper or anodized something else? either way i like the look of it.Ok, tired, but cruising along. Owner sent a care package of "stuff". Another one shipped today, but I digress. The guy switched from 6v to 12v. Sent a Powermaster generator deal. "Bolt on"...my ass. The intake manifold interfered with placement, as their rear casting was not like the stock one. View attachment 1080041
The body hit the acorn nut at bottom, and the weird flare rubbed the manifold, keeping it forward. Not to be deterred by some cast aluminum, I reshaped it. View attachment 1080042
With belt on and tensioned where it should be, just barely!
So, then to the next hurdle. The necks on the radiator had been changed, and the previous owner...probably in the 60's...had flex hoses. Oh hell no, not on this. Needed some formed hose bends, and some pipes. The angles are more extreme than the normal flathead kits and hoses, so had to figure it out. What I've done in the past was use the muffler tubing sticks from an auto parts store. 18" catalytic "deletes". Needed 1.5"
For the bends, I used two sbc lower hoses, cut the ends off of each. Easy peasy... Went to the parts house, and then another, and another...5 stores in total. 0, zip, nada! Well shit. Went to Ace hardware. I usually go with black painted steel, but this doesn't look bad. View attachment 1080043
Somewhere in there, also made some plug wires and got the looms mounted, and made a coil bracket. On this pic, you can see the factory wiring harness, and how it goes into the plug wire looms. The plug wire is a woven, shellac cover, and the plug ends are actual old Rajah ones. These were from the 40's and 50's, but they reproduce them now.
Bought 24" of 1.5" copper pipe from Ace hardware here in town. Cut it in half and polished the hell out of it...shows every fingerprint like a crime sceneis that 1.5" copper or anodized something else? either way i like the look of it.
 It's really a bit flashy for the rest of the car, but so is the flathead.


That's what I hoped...but the polish worked too wellDon’t worry about that shiny copper. By the time you read this on Tuesday it’ll be dull
Stuff hasn't dulled in a week!Thank you. We all have different "talents"...That is awesome!! I can’t believe how fast you pulled that together.. let alone putting together a new trans etc.. much more talented then me!
Last Monday I dropped by the machine shop...he swore I'll get the head this week. Yes, probably should have taken it to "the big city", but I don't know anyone there. The shop up here is good, but lord knows he isn't in a rush. There are two other machinists up here, both of them do mostly "race" stuff. One is usually 3+months out, and the other does nice work, when he wants, but has a "dependency" problem that effects both his work and his demeanor. Don't worry, it's coming soonThat is cool.
Now we need an update on the Monkey Mover. lol
") . I used the manual controls to lift the ass end, and get a look. The bag seats on the lower with a lip, like a tire bead. Due to time and parts availability, I got creative.
. I used the manual controls to lift the ass end, and get a look. The bag seats on the lower with a lip, like a tire bead. Due to time and parts availability, I got creative.the level of detail in some of the lowriders i have seen is mind blowing. might not be my thing but can definantly appreciate the work that goes into them.A brief recap of some of the other stuff this week:
Attention big pusher owners, this may come in handy! Most of them are air ride with hydraulic levelers. You are supposed to dump the bags, before hitting the levelers. If you don't, the rams have to travel further to start working. This Freightliner chassis was setup with shocks that won't limit the bags...fair enough, most people remember the order of operations. Well, this drove in on the snubbers.
View attachment 1083205
The owner is a traveling nurse, headed back out in 2 days
I pulled the bag right side out, and got it situated close to where it needed to be. I lowered the chassis until the bag was slightly compressed, and the lip around maybe 75% of the seating area. Tough bag, and fingers only so strong.
Soooo, lowered it a little more, checked alignment again, flipped the air ride to auto and lowered the chassis off the levelers.
In theory, the weight should force the bag to increase diameter before gaining hieght...Right?
Well, the chassis rose about an inch, and then "pop!", the lip seal went back on. Brought it up to ride height, and shut everything off. Listened for leaks and sprayed it with soap water...good deal! View attachment 1083209
That's how the bag sits at ride height.
New and exciting stuff.
Had a call from a guy that needed a little help trouble shooting his small block Chevy. It was a timing issue, which led to carb adjustment...and he needs to get a vacuum pot for the HEI before any of it can be done. The car is pretty cool though. Dusty, but still one you have to watch the paint! View attachment 1083210
Boxed and plated frame and A-arms. More chrome and engraving than I've ever seen! His daily is a stock late model Suburban (with massive rims), but also has a beautiful, stock, Bentley two door.
I like most cars. You may not like low riders, but should still appreciate the effort involved!
A brief recap of some of the other stuff this week:
Attention big pusher owners, this may come in handy! Most of them are air ride with hydraulic levelers. You are supposed to dump the bags, before hitting the levelers. If you don't, the rams have to travel further to start working. This Freightliner chassis was setup with shocks that won't limit the bags...fair enough, most people remember the order of operations. Well, this drove in on the snubbers.
View attachment 1083205
The owner is a traveling nurse, headed back out in 2 days
I pulled the bag right side out, and got it situated close to where it needed to be. I lowered the chassis until the bag was slightly compressed, and the lip around maybe 75% of the seating area. Tough bag, and fingers only so strong.
Soooo, lowered it a little more, checked alignment again, flipped the air ride to auto and lowered the chassis off the levelers.
In theory, the weight should force the bag to increase diameter before gaining hieght...Right?
Well, the chassis rose about an inch, and then "pop!", the lip seal went back on. Brought it up to ride height, and shut everything off. Listened for leaks and sprayed it with soap water...good deal! View attachment 1083209
That's how the bag sits at ride height.
New and exciting stuff.
Had a call from a guy that needed a little help trouble shooting his small block Chevy. It was a timing issue, which led to carb adjustment...and he needs to get a vacuum pot for the HEI before any of it can be done. The car is pretty cool though. Dusty, but still one you have to watch the paint! View attachment 1083210
Boxed and plated frame and A-arms. More chrome and engraving than I've ever seen! His daily is a stock late model Suburban (with massive rims), but also has a beautiful, stock, Bentley two door.
I like most cars. You may not like low riders, but should still appreciate the effort involved!
My uncle from Bassett had one when I was real young, late 70's. I remember lots of chrome, and it was called "Chapel of Dreams"...seems to me it was purple or maybe maroon.If I had FU money my collection would definitely include a few low lows.
My uncle from Bassett had one when I was real young, late 70's. I remember lots of chrome, and it was called "Chapel of Dreams"...seems to me it was purple or maybe maroon.
Don't know what happened to it when he went to prison
I've had some customs, but no real lowriders. Maybe the Riviera will get some bass boat flake and some candy.
Maybe the Riviera will get some bass boat flake and some candy.
One of my neighbors past away about a year and a half ago. He was a true hermit, made me seem like a social butterfly. We had talked a few times, he was into cars and bikes.Riviera?!?!?!?! do tell more
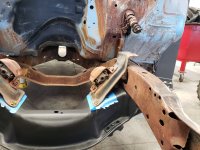
This has been part of the learning curve. On an early C10, the torsion bar front end is way different! You have to drill out 3 holes on each side, if I remember right.On my 65 C-10 I put a 77 Silverado front end on it. Had to elongate 1 hole. Looks like what you are doing will work just fine.
damn, you have some mad skills. bravoOk, things went well. Well, as best as could really. View attachment 1081361
Jack the ass end up, high enough to unbolt the buggy spring and lower the axle assembly. Unbolt the u-joint housing, brake rods and shocks, and roll it back about 8 inches. Pull u-joint, support rear of motor and remove trans through the passenger door.
Then dig through a metric ton of crap to find detent balls and springs for the shift tower, and a shift lever...they're different for different years. View attachment 1081362
Now, reverse the above process, adjust the clutch play and have a look...
All this, but really the main goal was to change the housing clearances. The fact it ended up with synchos, better gears and a stronger trans are secondary this time. Here's the new space... View attachment 1081363
Almost a solid 1/4"...woo-hoo!
And now, after more than a half century locked away, she drove herself into the sun for the first time! View attachment 1081364
She's not going to win any trophies, but she's very cool.
View attachment 1081365
Thank you. Not really so much skill as it was necessity for stuff me or my friends owned. Basically, the order of driveline failure was tranny's, U-joints then differential or the dreaded axle.damn, you have some mad skills. bravo
PM sent...Monkey Wrench how can my brother get a hold of you ? He lives off of Coyote Springs Rd on Marrow. I told him about you and wants to know if you service John Deere tractors ? I think it's a series 4.
Thank you. She'd spent a lot of hours in my wife's class, up until covid and such.You are a good guy to do this.....
From early Fords, to Toyotas...God knows what in between...and finally...
Are you coming to Havasu this weekend?
Back to a Monkey
Pretty sure I got all parts needed from the far reaches of the intrawebs. The biggest hold ups were proper valve stem seals and rear main. The stem seals provided were...sub-par we'll say. Even with the guides being good, too much of a risk.
So, onward...tonight I unwrapped the crank, rods, pistons and the abnormal weird crap. Laid parts out on a couple clean donor T-shirts, and got busy. The "abnormal" stuff I spoke of is in reference to the counter balance shafts. Big for the size of motor. Oddly, they take journal bearings, like a cam shaft in normal stuff. The driven gears are bakelite...the distant and ancient cousin to composites. They make them this way to be quieter, no howling gear drive. Always have to inspect them when things are apart. Debris gets stuck in the teeth and game over. View attachment 1088756
The shortblock is kind of done...there is a front and rear appliance deal for the main seals. For the time being, leaving them off. The counter balance shafts themselves are identical. It matters how they are installed. Single dot to single, double to double. Weird to me. One of them gets a drive gear mated to the driven gear, which in turn spins a driven gear on the oil pump. It does so with a tiny bicycle type chain...also, weird. View attachment 1088757
Not much, but it is progress. Hopefully be installing it next week.
Car show and fireworks in Havasu this weekend...family time!
Well, manager of company that owns truck is up shop owners ass...shop owner calls a bunch of machine shops, no one wants to touch it. Manager guy mellows a bit when he finds out someone dropped the ball on their end.
No one wanted to try. I figured why not? Looked at it, and said sure, but can't really offer a warranty.
So it started.
View attachment 1094337
The shafts were not hardened like most gear shafts. I guess it's more of an ag type thing? So, I started off by back filling the keyway. "Real" shops have carbon keys to backfill to...I'm not one of them, and couldn't wait. I coated the key stock with Whiteout. Oddly, can weld right to it, but won't "stick".
The worn area on the shaft I brazed with aluminum bronze. It's supposedly stronger than silica bronze. I did that, and then turned the shaft down to the original diameter.
Well, it fit the gear like a hotdog in a hallway
From coming loose, it wore the gear in an irregular fashion. So, added more metal to the shaft, and started to shape. Test fit. Press enough for witness marks, rinse and repeat. No pics of that, was pulling my hair out.
View attachment 1094338
Here it is, light press, and hopefully where it needs to be. At the bottom of the shaft, you can see how much the gear was hogged out. Luckily, the other side and keyway indexed it pretty well.
View attachment 1094339
Please don't laugh at my lathe...Will upgrade again eventually.
Moment of truth. Honestly, I was hoping to end up with run out maybe .010".
I about fell over, ended up with a tad over .0035"...for my equipment and skills, that is some SpaceX kind of stuff! Really just luck, but in this case it was better to be lucky than good.
View attachment 1094340
Here's the setup, in one side out the other. Went old school, coated it with Lubriplate, sat it together and checked the teeth.
When that looked right, I decided to right stuff the thing and call it good. The bearing races determine the preload. I had no gaskets. Decided right stuff would be thinner than the old gasket, but bearings are worn. Preload was still a bit looser than I'd like, but on a time crunch. View attachment 1094341
I also swapped the input and output. This places the torsional load on the factory machined key slot, and not my repaired area.
The idea is for this to buy some time. The new part is ordered, but will be awhile. The guys who run this truck get paid by the square foot. No truck, no money. Their boss kind of hosed them...but now it effected him since scheduled work gets hammered.
Truck is together and tested, hopefully it lasts "10-20 weeks".
Bidenzuela repairs.
Dirty hands, clean money
I hadn't thought of the matching on the gear teeth...like putting lifters back on the same cam lobe. The good thing, this particular truck is so noisy, the gear drive isn't heardHelpful tip to anyone playing with gear boxes (especially worn ones) . It's a good idea to match mark your gears. If the ratio is an odd number it wont make much difference but if the the ratio is an even number then the gears will establish a certain wear pattern and if you change where the gears mesh it can create a nasty gear whine that will never go away.
Tip #2 If you have access to a glass beader you can use C-glass bead to clean the gear teeth and in doing so you will peen the surface of the gear and it will reduce "flecking" of the surface during use and extend the life of the gear box.
Just a couple of nice things to know from someone that has done literally thousands of gear boxes.
Almost looks like you could have retrofit a v-drive to get the job done.
Helpful tip to anyone playing with gear boxes (especially worn ones) . It's a good idea to match mark your gears. If the ratio is an odd number it wont make much difference but if the the ratio is an even number then the gears will establish a certain wear pattern and if you change where the gears mesh it can create a nasty gear whine that will never go away.
Tip #2 If you have access to a glass beader you can use C-glass bead to clean the gear teeth and in doing so you will peen the surface of the gear and it will reduce "flecking" of the surface during use and extend the life of the gear box.
Just a couple of nice things to know from someone that has done literally thousands of gear boxes.