WELCOME TO RIVER DAVES PLACE

Toy hauler Reno! Again. Input welcomed/needed

DoughBallin14

Well-Known Member
Joined
Apr 22, 2014
Messages
973
Reaction score
1,157
Alright so this is to continue off of my previous post a couple weeks ago.

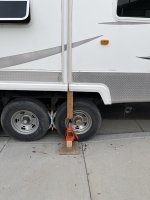
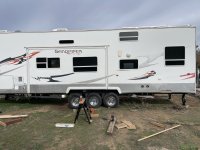
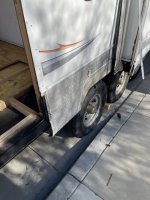
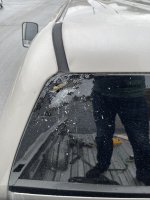
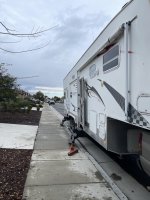
I picked up a 2007 forest river sandpiper sport 40spts. Triple axle, 12 foot garage, 2 240w solar panels with inverter, 260 hr onan 5500 gold. Feel like i got a great price and plenty of room for improvement and value if i ever needed to sell it.

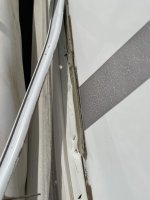
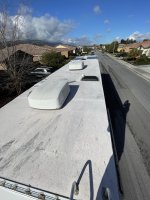
Roof was resealed about 3 years ago and looks decent but might seal it again after the main things i want to address first.

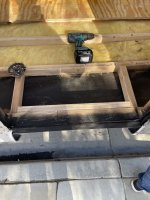
Hoping to update consistently and try my best to avoid an rv shop for anything i find.

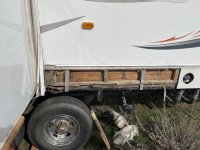
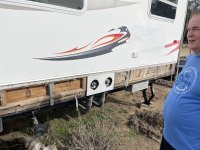
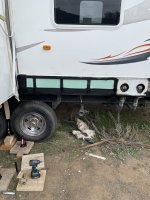
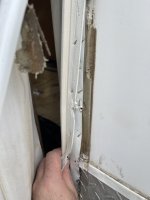
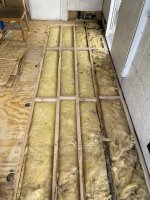
I am very handy and have most tools needed in carpentry and basic fab, Fingers crossed it works out. So far couldn't see or find and soft spots or dark water stained wood when looking inside the outside access cabinets and such.
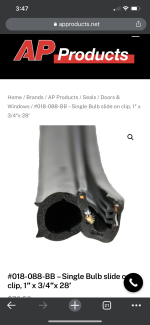
 

Attachments

  • 72F49703-817A-4D22-9C9A-45ED45E375EB.jpeg
    72F49703-817A-4D22-9C9A-45ED45E375EB.jpeg
    527.4 KB · Views: 92
  • 95B52393-0E25-49C7-8C04-0D05C07E7A07.jpeg
    95B52393-0E25-49C7-8C04-0D05C07E7A07.jpeg
    584.7 KB · Views: 86

DoughBallin14

Well-Known Member
Joined
Apr 22, 2014
Messages
973
Reaction score
1,157
Alright! Step one was the slide out issue for the one dinette slide that stops halfway as it goes out. In my other thread before buying i had mentioned it had an issue and some comment on possible issue. So here is an update on that. This will halt all my improvements and projects until i can get it figured out.

The system has 3 slides, one bedroom with the ram and track under the bed and 2 opposing slides in the kitchen. All slides need wiper seals as they are dried and cracked or pulled out of their mounting screws. Not sure what style seals yet

1- Its a lippert hydraulic system with one switch to send them in and out. Through frame rack an pinion with single hydraulic ram per slide.

Standard up/down, side to side, and in n out adjustments.

Dinette slide is the issue slide.
Attached pictures show the issue. From inside as i send the slide out you can see in the attached pics that the right side has a gap of about 1 1/4 inch gap from the frame cutout and the roof too of the slide room.
On the left side when room is in there is about 1/4 inch and as it goes halfway out it jams the roof of slide room to the top of the framed opening causing it to stop.
I adjusted the slide all the way down using the outside adjuster nuts and it made almost zero difference for clearance.

Can anyone think of the cause for the the opening to either shrink on the one side? The floor of the slide looks to be resting on the kitchen floor so i dont believe anything is stuck under it to cause it to be lifted up.

I am so far ruling out a wall sag or rotted post there as i cant find and buckling or cracks on the walls near there or on the outside.

Also attached is a link for adjusting this style slide if others need it 👍🏽
 

Attachments

  • 1F6D13FC-1FCD-4E46-A5E6-E0BAD6719807.jpeg
    1F6D13FC-1FCD-4E46-A5E6-E0BAD6719807.jpeg
    354.2 KB · Views: 83
  • AB1D69ED-F787-4A42-ADBD-16729CB0820F.jpeg
    AB1D69ED-F787-4A42-ADBD-16729CB0820F.jpeg
    448.5 KB · Views: 79
  • 496FB659-517C-4C34-86B1-5D344FF6F351.jpeg
    496FB659-517C-4C34-86B1-5D344FF6F351.jpeg
    463.5 KB · Views: 77
  • C48F9E4A-E0BF-4BE7-B8B5-84B8AC283B0E.jpeg
    C48F9E4A-E0BF-4BE7-B8B5-84B8AC283B0E.jpeg
    472.8 KB · Views: 84

rivermobster

Club Banned
Joined
Dec 28, 2009
Messages
56,558
Reaction score
53,933
Ah ya i got that carriage bolt and nut i was replacing it during some adjustments. Just not in this picture i posted.

Get some lube on that stuff. I like the red synthetic grease personality.

Did it make any difference having everything back in place and lubed?
 

CLdrinker

Well-Known Member
Joined
Sep 28, 2011
Messages
8,418
Reaction score
16,065
God I hate slides. Nothing but a pain in the freakin ass.
Either leaking or not going in and out constantly. But the wife won’t buy an RV without them.

Good luck!
 

DoughBallin14

Well-Known Member
Joined
Apr 22, 2014
Messages
973
Reaction score
1,157
Get some lube on that stuff. I like the red synthetic grease personality.

Did it make any difference having everything back in place and lubed?
I went to town with my tri-flow teflon spray lube and my maxima blue grease and all that moves is definitely smoother.
No adjustments helped. I will rip up some flooring this weekend and take measurements. I am kinda leaning towards some floor rot that might have swollen and lifted that side of the slide causing the gap to close.
Previous owner had adjusted the slide a couple times over the past 2-3 years he told me last night. Thats why i am leaning to some swollen wood now on the slide floor and possibly the main floor.
 

DoughBallin14

Well-Known Member
Joined
Apr 22, 2014
Messages
973
Reaction score
1,157
God I hate slides. Nothing but a pain in the freakin ass.
Either leaking or not going in and out constantly. But the wife won’t buy an RV without them.

Good luck!
Agreed i could do without the slides but that argument i will never win

Thanks. Ill see what we get into. I do have the ability to take the slide all the way out and onto a dolly to repair the opening if i needed. After i find a way to get it to come out all the way without damaging anything more
 

rivermobster

Club Banned
Joined
Dec 28, 2009
Messages
56,558
Reaction score
53,933
Agreed i could do without the slides but that argument i will never win

Thanks. Ill see what we get into. I do have the ability to take the slide all the way out and onto a dolly to repair the opening if i needed. After i find a way to get it to come out all the way without damaging anything more

Damm...

You have a garage big enough to do all that work in??

Can I rent it from you when you're done? 😁
 

DoughBallin14

Well-Known Member
Joined
Apr 22, 2014
Messages
973
Reaction score
1,157
Damm...

You have a garage big enough to do all that work in??

Can I rent it from you when you're done? 😁
Haha man i wish!! Once the socal weather dries up again and warms a bit ill be able to do anything outside. My buddy has a 2 acre lot down the street from my house where i store the trailer and he keeps his transfer truck. All compacted gravel with gantry lifts and dolly tables. Large blocks and pallet stacks etc haha. I would like to avoid that kind of work but we will see
 

DoughBallin14

Well-Known Member
Joined
Apr 22, 2014
Messages
973
Reaction score
1,157
Quick update:
Alright got home early today and grabbed the trailer and started emptying out all the storage crud he had and then started to remove some carpet and linoleum from the problem corner outside the slide and so far we got water issues. Definitely some festering rot 🤦🏽‍♂️ lovely.
I am assuming this is probably running along the length from this corner pictured to the left down through the garage toward the back of the rig. Most like causing a sag of the whole exterior on this side. Ill demo some more and see what gets uncovered.
 

Attachments

  • E96C478A-FAB6-422C-B946-90BE6CDC74CE.jpeg
    E96C478A-FAB6-422C-B946-90BE6CDC74CE.jpeg
    451.4 KB · Views: 130
  • 2BDB1A8A-A0B0-42D5-B644-3B30AFCA9A8F.jpeg
    2BDB1A8A-A0B0-42D5-B644-3B30AFCA9A8F.jpeg
    558.4 KB · Views: 138

DoughBallin14

Well-Known Member
Joined
Apr 22, 2014
Messages
973
Reaction score
1,157
Alright got the carpet up on the slide and not as bad as i was thinking! Two corners have some wet spot. My guess is from the recent rains we had. Now gotta find that leak as well.
 

Attachments

  • 92EFB1D1-7FF9-4123-9A32-CC41CA261BCF.jpeg
    92EFB1D1-7FF9-4123-9A32-CC41CA261BCF.jpeg
    810.7 KB · Views: 85
  • 86114077-6DD1-4488-8C95-88A854370020.jpeg
    86114077-6DD1-4488-8C95-88A854370020.jpeg
    642.2 KB · Views: 88

DoughBallin14

Well-Known Member
Joined
Apr 22, 2014
Messages
973
Reaction score
1,157
Well looks like sub floor gave out and now its all visible. Driver side with the main slide wall is sagging because sub floor is gone.

Here are some pics of the gapping and the dead give away in the garage.

On another note i was able to open the slide all the way by doing the old weekend warrior frame gusset SOP. Put bottle jack and rear stabilizer down tight and then raise front landing gear and basically relax the frame. By letting the center where the wheels are drop the load. Basicaly by creating a banana shape it lifted the side wall and created the space needed between the corner and header of the slide.
 

Attachments

  • 67168D26-4753-4252-9C02-1CA41921B4E3.jpeg
    67168D26-4753-4252-9C02-1CA41921B4E3.jpeg
    657 KB · Views: 103
  • 158BA867-C1C0-4184-9D59-C36139545439.jpeg
    158BA867-C1C0-4184-9D59-C36139545439.jpeg
    966.4 KB · Views: 108
  • B326F61A-259F-4AA4-AB94-563B1BC229A4.jpeg
    B326F61A-259F-4AA4-AB94-563B1BC229A4.jpeg
    927.6 KB · Views: 107

DoughBallin14

Well-Known Member
Joined
Apr 22, 2014
Messages
973
Reaction score
1,157
Yep boys we got a problem haha! This is slide all the way out
 

Attachments

  • 7CAC01D3-E73D-4FCD-B15F-C32082A7A05A.jpeg
    7CAC01D3-E73D-4FCD-B15F-C32082A7A05A.jpeg
    331.6 KB · Views: 137
  • A10C3EA3-1414-4707-824B-BCCD291AA10B.jpeg
    A10C3EA3-1414-4707-824B-BCCD291AA10B.jpeg
    426.2 KB · Views: 134
  • 309C06D9-D326-4094-AF15-43BE139FEFA9.jpeg
    309C06D9-D326-4094-AF15-43BE139FEFA9.jpeg
    714.3 KB · Views: 131
  • 29F3BC48-0CE2-419C-BE2E-F4836A6567F5.jpeg
    29F3BC48-0CE2-419C-BE2E-F4836A6567F5.jpeg
    591.7 KB · Views: 130
  • 78AFD393-ED68-493F-9E94-F48D992D7C13.jpeg
    78AFD393-ED68-493F-9E94-F48D992D7C13.jpeg
    732 KB · Views: 134

DoughBallin14

Well-Known Member
Joined
Apr 22, 2014
Messages
973
Reaction score
1,157
mission #1
-Take slide out, out of trailer and out of the way.
-jack up multiple spots of that wall from the outside like the picture which is pushing up on the aluminum extrusion piece that surrounds the slide out opening.
- cut out the bad subfloor in big sections.
- most likely add 3/16 or 1/4 aluminum angle and span them across the traingle out rigger that come off the ibeam of the frame. They are roughly spaced 4-5 feet apart.
- replace all seals with new from steelerubber.com while its out and will check the floor and re seal the edges and everything of the slide room
- then slide her in and get it all adjusted and bobs your uncle.


I think the problem and source of this issue stems from the last tire splashing the underside while driving on wet roads and such for 15 years, It launches right at that area with most rot. I could not find any rips or holes or repairs on the roof. So thats my idea there. With the jack placed where it is i can lift the side was over an inch with ease which is crazy!

Looked at the same spot on the passenger side and there is a small spot of spongy wood on the underside on the exact spot.

Stay tuned my friends.
 

Attachments

  • 76E9121D-796B-4AC4-A0E5-C57CA96B3EAE.jpeg
    76E9121D-796B-4AC4-A0E5-C57CA96B3EAE.jpeg
    402.2 KB · Views: 88
  • 2661E64D-101B-4819-9770-40547CEF9E97.jpeg
    2661E64D-101B-4819-9770-40547CEF9E97.jpeg
    540.9 KB · Views: 92

DoughBallin14

Well-Known Member
Joined
Apr 22, 2014
Messages
973
Reaction score
1,157
Sorry pal
All good appreciate it!
I mean kind of expected these days on 10-15 year old rigs for cheap. If i had RDP inmate money i would cash buy something way newer haha.

Just glad i have the resources, friends, and enough carpentry / mechanics background to be able to tackle most things i come across.

Starting to feel like this could turn into a thread like Kaotyks bus build or Hydroskeamin s amazing stresseliminator restoration thread. Although mine wont be as detailed and awesome as theirs.
 

DoughBallin14

Well-Known Member
Joined
Apr 22, 2014
Messages
973
Reaction score
1,157
Here we are finally in the meat and potatoes of the repairs. I am home and on call a couple days so i have plenty of time to get into this, but of course we have socal rain this week on and off. Should at least have the slide back in and safe by the time the rain comes tomorrow.

So here we go. I took the slide out and slid it back while having it supported with bottle jacks just for extra support and safety.

As you can see i de-skinned the outside diamond plate and was able to reveal the side walls and the rotted wall. Of course the diamond plate was barely hiding the exposed walls. The fiberglass siding ends at the the seam where the diamond plate starts 🤦🏽‍♂️

Today i got the rotted 2x3 and 3/4 ply strip shim they had that supported the vertical studs of the wall.
I upgraded with 2x4 and sealed all the new wood. The pressure treated stuff from lowes near me was horrible and twisted like rigatoni noodles haha.
Also grabbed some 23/32 exterior cdx and sealed it as well ready for patching back the flooring pieces i cut back to expose areas for new framing.
In the third picture you can see that that slide support has nothing support it. When i got it apart it looks like the factory measured the length wrong and the added a little scab piece of wood to hold the edge. Which failed miserably. No surprise we all know how these are all stapled together.

Tomorrow i will get the backing and more bracing put on where i cut open the floor and get the plywood locked in and set the slider tray and get the side out put on and get the wiper seals replace
 

Attachments

  • C226118F-FCD0-492E-9A89-690AEF0811B2.jpeg
    C226118F-FCD0-492E-9A89-690AEF0811B2.jpeg
    771.3 KB · Views: 115
  • 652C6A11-DF24-4DE1-93A7-BB373C597CD0.jpeg
    652C6A11-DF24-4DE1-93A7-BB373C597CD0.jpeg
    529.6 KB · Views: 111
  • 86732ACE-9237-4C95-9805-29F9ECCD8F9E.jpeg
    86732ACE-9237-4C95-9805-29F9ECCD8F9E.jpeg
    826 KB · Views: 108
  • 15F6F72D-15CD-4DE3-95B7-4C5DD8EA5E4E.jpeg
    15F6F72D-15CD-4DE3-95B7-4C5DD8EA5E4E.jpeg
    1.2 MB · Views: 113
  • E1ABC91F-7F05-4EA3-931C-3EC7F8594AA7.jpeg
    E1ABC91F-7F05-4EA3-931C-3EC7F8594AA7.jpeg
    1.1 MB · Views: 112
  • 045CF138-9A91-4FBB-A74C-0A59C603AD31.jpeg
    045CF138-9A91-4FBB-A74C-0A59C603AD31.jpeg
    699.6 KB · Views: 114
  • FA1AF3B5-D0E5-4979-97D5-07D95BD6D8F7.jpeg
    FA1AF3B5-D0E5-4979-97D5-07D95BD6D8F7.jpeg
    987 KB · Views: 112
  • 436A4960-DDB4-486B-A2E3-6CC640213883.jpeg
    436A4960-DDB4-486B-A2E3-6CC640213883.jpeg
    1.1 MB · Views: 109
  • 07276EFB-0FA7-431D-BC5D-F46604188F34.jpeg
    07276EFB-0FA7-431D-BC5D-F46604188F34.jpeg
    787.8 KB · Views: 112
  • 7A5D628E-6CD8-4BA3-A978-3674BB338AC2.jpeg
    7A5D628E-6CD8-4BA3-A978-3674BB338AC2.jpeg
    804.7 KB · Views: 112
  • 17F3607E-E054-40B5-B7E9-16C62EBEC98E.jpeg
    17F3607E-E054-40B5-B7E9-16C62EBEC98E.jpeg
    643.9 KB · Views: 114

DoughBallin14

Well-Known Member
Joined
Apr 22, 2014
Messages
973
Reaction score
1,157
Do you think there is Any chance the seller doesn't know about this?

I'd be willing to bet, he knows.
Oh ya i have sent him a few during the discoveries. The guy was a but airhead ish when i talked to him originally.

He said that is crazy and that he has had to adjust the slide out a few times over the years to get it to open.

Definitely not a guy that wants to give me some money back though lol
 

DoughBallin14

Well-Known Member
Joined
Apr 22, 2014
Messages
973
Reaction score
1,157
This guy also claimed to me that he added the renogy 400watt solar system because the batteries wouldnt last the night with the furnace fan running so he would run the generator a lot.

Well looked into that and he had 2 old 2017 dated tiny 12v group 24 interstates that advertised 81AH when i looked them up. So 162 total.

So took measurements of the battery tray cabinet and i can fit 2 12v group 31s from crown rated at 110ah a piece. Combined 220ah should help out more.

I dont have the height to run 2 gc2 6 volt golf carts batteries. In case anyone was going to mention that.
 

DoughBallin14

Well-Known Member
Joined
Apr 22, 2014
Messages
973
Reaction score
1,157
Today’s festivities are all done as far as the slide being back in order! End of the story is slide move in and out freely and is pretty much adjusted to the right spot. Major success and only a few hundred bucks in material.

My floor patch spots are small but in the garage after a few other spots found near the wall edges i will work on re decking the garage completely one day.

So we got the side wall on the exterior all sealed and I had some 1-1/2 inch steel angle metal and figured ah why not span that across the 3 support outrigger and will help support the entire 2x4 we replaced. Sealed that up with some rubber undercoat cans i had. Also added simpson straps to the vertical studs to hold more together. Also added 1/4 inch exterior sheet plywood sealed for the diamond plate piece.
Now before the factory had the sill beam, studs and insulation exposed completely behind the diamond plate.
Everything was put back together using exterior decking spax brand screws which i have used for years and like their lag products. Should hold way better then the staples the factory uses to put these rigs together.
 

Attachments

  • 450C9485-21BA-4C41-A647-D03C5917DF9A.jpeg
    450C9485-21BA-4C41-A647-D03C5917DF9A.jpeg
    717.7 KB · Views: 79
  • 9DAA2DE3-161D-475F-81E5-A4654838115F.jpeg
    9DAA2DE3-161D-475F-81E5-A4654838115F.jpeg
    755.7 KB · Views: 80
  • DB1C38D7-446B-440F-A9A4-973AF772C2C3.jpeg
    DB1C38D7-446B-440F-A9A4-973AF772C2C3.jpeg
    1.3 MB · Views: 79
  • A21DAAB2-DC2C-47CE-B578-7711F492099E.jpeg
    A21DAAB2-DC2C-47CE-B578-7711F492099E.jpeg
    799.2 KB · Views: 79
  • FCE9BA25-EE87-454E-8B4E-736F516E73AB.jpeg
    FCE9BA25-EE87-454E-8B4E-736F516E73AB.jpeg
    1,022.5 KB · Views: 77
  • 89F41079-7405-4524-90ED-C6864BA6EAE0.jpeg
    89F41079-7405-4524-90ED-C6864BA6EAE0.jpeg
    832 KB · Views: 78
Last edited:

DoughBallin14

Well-Known Member
Joined
Apr 22, 2014
Messages
973
Reaction score
1,157
Most people don't want to see what lies beneath the surface of a mass produced RV

Good job building it back better!
Thanks for the support. It is kinda crazy to see who they are built. Definitely only expected to last a few years haha. Staples everything and stripped low grade screws.
 

DoughBallin14

Well-Known Member
Joined
Apr 22, 2014
Messages
973
Reaction score
1,157
So next struggle is finding a new wiper seal for all the slides. So far struck out with steele rubber and ap products. They both say its a weird profile and no something they have seen normally.

Basically its a 4 inch by 1/4 inch tapered to 1/8 inch strip of epdm rubber that is sandwiched between the fiberglass siding and the aluminum insert trim extrusion.

When the slide is closed is has a seal the goes around the outer edge of the flange that seals against this odd wiper.. the edge seal is a single bulb on the side the just hammers on which i found by both suppliers.
Looks like the picture attached. Just black instead of white
 

Attachments

  • 1538D9AD-B9B0-4335-AD1F-BA98C816B9BE.jpeg
    1538D9AD-B9B0-4335-AD1F-BA98C816B9BE.jpeg
    396.8 KB · Views: 83
  • DA252FC1-0231-487E-B99D-64F9827AF421.jpeg
    DA252FC1-0231-487E-B99D-64F9827AF421.jpeg
    288.7 KB · Views: 73
  • 5148DBC1-D8BD-4A56-9018-53F9167A5E36.jpeg
    5148DBC1-D8BD-4A56-9018-53F9167A5E36.jpeg
    462.4 KB · Views: 74
  • 89133772-4CA5-4D93-9FBD-1380EAC92E47.jpeg
    89133772-4CA5-4D93-9FBD-1380EAC92E47.jpeg
    334.1 KB · Views: 72
  • F9AD3B33-36C3-4ED2-A327-081E07C7F4C9.png
    F9AD3B33-36C3-4ED2-A327-081E07C7F4C9.png
    610.7 KB · Views: 69
  • AACE3A17-DFEA-444D-A8AD-3A95DC67EAF5.jpeg
    AACE3A17-DFEA-444D-A8AD-3A95DC67EAF5.jpeg
    455.1 KB · Views: 70
  • 20AE00B1-CF61-4790-B9B6-A1AAB1D53669.jpeg
    20AE00B1-CF61-4790-B9B6-A1AAB1D53669.jpeg
    359.6 KB · Views: 66
  • 4B6F6596-D7CA-4A2D-AB6A-07A450AE7546.jpeg
    4B6F6596-D7CA-4A2D-AB6A-07A450AE7546.jpeg
    431.7 KB · Views: 70

DoughBallin14

Well-Known Member
Joined
Apr 22, 2014
Messages
973
Reaction score
1,157
Ok ok holidays are over and finally back to some trailer updates! I am sure you all were wondering.

So after the rebuild of the driver side wall sag and rotted sill beam etc.
I just had this feeling i needed to look at the same spot on the passenger side also i semi notice a dip as i walked out the garage side door. Soooo take a look! I would say this side is worse as far as size of water intrusion. more wood to replace but its not as separated and blown out like the previous side. If you look close in one pic now you can see how it crowns near the wall and just dives off towards the wall.
Now after this i will be re sheating the whole garage subfloor and adding in blocking and more supports to tie in the 2x3 floor beams. Definitely want full t and g sheets now instead of patches.

Oh and i am re sealing my roof with the help of an rv repair friend tomorrow so i will update that as well.

4F9DBDB8-CF15-47AA-BC9E-CB11A99CEDFD.jpeg
563B1803-2659-404F-92A9-BCB29692B2A4.jpeg
80B20191-7A59-4465-B000-CBB01F1D6936.jpeg
4EC74FE5-2400-4C58-AFE4-0CAA545D9DD4.jpeg
C59E1216-A387-45EF-9ED3-D324C5B82C28.jpeg
7EC76B44-9493-42D4-9F30-617D76B20017.jpeg
3111941A-EDEE-4474-929F-4966855B4A35.jpeg
 

Attachments

  • 6CDB36D5-5604-46F4-81B8-538054F3313A.jpeg
    6CDB36D5-5604-46F4-81B8-538054F3313A.jpeg
    406.9 KB · Views: 47

yz450mm

Well-Known Member
Joined
Jun 10, 2013
Messages
3,428
Reaction score
6,775
I had a 2005 Tahoe transport fifth wheel toy hauler that had the wall sag problem, the factory took it back and jacked the walls up and added more Z Outriggers on each side.

They didn't even fight it, they realized they had f***** up by having too little support for the walls and roof.
Ok ok holidays are over and finally back to some trailer updates! I am sure you all were wondering.

So after the rebuild of the driver side wall sag and rotted sill beam etc.
I just had this feeling i needed to look at the same spot on the passenger side also i semi notice a dip as i walked out the garage side door. Soooo take a look! I would say this side is worse as far as size of water intrusion. more wood to replace but its not as separated and blown out like the previous side. If you look close in one pic now you can see how it crowns near the wall and just dives off towards the wall.
Now after this i will be re sheating the whole garage subfloor and adding in blocking and more supports to tie in the 2x3 floor beams. Definitely want full t and g sheets now instead of patches.

Oh and i am re sealing my roof with the help of an rv repair friend tomorrow so i will update that as well.

View attachment 1186812 View attachment 1186813 View attachment 1186814 View attachment 1186815 View attachment 1186816 View attachment 1186817 View attachment 1186818
 

DoughBallin14

Well-Known Member
Joined
Apr 22, 2014
Messages
973
Reaction score
1,157
Sorry pal...you are doing an amazing job with it though!
Ah no worries just glad honestly that the access to these areas is pretty good without having to cut and patch wall sheets or fiberglass that i can find or match anymore.
👍🏽
 

DoughBallin14

Well-Known Member
Joined
Apr 22, 2014
Messages
973
Reaction score
1,157
I had a 2005 Tahoe transport fifth wheel toy hauler that had the wall sag problem, the factory took it back and jacked the walls up and added more Z Outriggers on each side.

They didn't even fight it, they realized they had f***** up by having too little support for the walls and roof.
Nice i am sure that happened a lot. I am surprised with this frame that there is actually a good amount of triangle out riggers from the i beam that go almost all the way to the outside edge of the walls. I would say average space ,where there isnt a slide out, is about 12 - 18 inches.

One thing i dont get is why in the garage did the run the 2x3 support studs for the plywood decking front to back parallel with the beams of the frame of the trailer.
I my self would have ran them perpendicular across the 2 i beams from side wall to side wall about 12 inches apart then sheeted the decking. These studs are honestly floating in some spots in the center of the trailer.
 

DoughBallin14

Well-Known Member
Joined
Apr 22, 2014
Messages
973
Reaction score
1,157
Little update on the repairs. Should wrap it up minus sheeting the garage floor. Way more solid feeling now!
Also should finish the roof coating tomorrow. Had to replace 3 dome roof vent caps also while i was up there.
122F6C2B-BBDE-4BE5-A8F9-92E977220D9A.jpeg
E2A43038-8D27-436B-A087-AD00C2F7FCF0.jpeg
998A8E61-A477-475D-91B6-0A060C908BB2.jpeg
924E90FA-942C-4AC2-A29F-E32469529A4E.jpeg
8FC446E7-432B-4419-B39B-0C6D68AD25B8.jpeg
 

Ladsm

Well-Known Member
Joined
May 30, 2017
Messages
1,162
Reaction score
2,744
My biggest nightmare when I see trailers for sale. When I sold my toyhauler they kept low balling me and I explained that mine was all aluminum framed and no wood was stapled holding it together. Great job rebuilding it.
 

King295

Well-Known Inmate #20225
Joined
Aug 8, 2017
Messages
1,827
Reaction score
2,757
Man, you are deep into this thing but I'll bet you enjoy the hell out of it once its done. I've got a 5th wheel that I bought practically new with two slides and I still cringe every time I open the things. I bet you won't have that problem knowing you got them done right. Thanks for taking us along on this project.
 

DoughBallin14

Well-Known Member
Joined
Apr 22, 2014
Messages
973
Reaction score
1,157
No problem guys glad to share the journey!
I would definitely love the aluminum framed coaches, their value holds strong for sure if you know.. she is definitely more solid now and i think i am just finished with the structural stuff now. Definitely the saving grace in the project is being able to remove the diamond plate and just having full access to the main areas needed.
 

DoughBallin14

Well-Known Member
Joined
Apr 22, 2014
Messages
973
Reaction score
1,157
Todays update was a long day for sure. Got a few more pieces of decking to cut out of the garage and then i can finish sheeting it again. I added horizontal blocking to tie everything in and stop the floor shifting. Plus more areas to screw down the plywood.

Also the roof re seal is done and should be good just in time for the rain. Didnt get many pictures but its done and coated with an Elastomeric coating. Link below. My friend swears by this stuff for the epdm rubber membrane roofs. He also had a background in commercial roofing.

https://www.apoc.com/products/roof-...performance-elastomeric-roof-coating-apoc-248
 

DoughBallin14

Well-Known Member
Joined
Apr 22, 2014
Messages
973
Reaction score
1,157
Pics of the day.
Roof before and after.
Bracing/blocking for garage floor.
Boxed in the entry step and door area. Crazy before is was just the exterior sill stud and the plywood in this area. And the 3 step unit attached and hung from the underside of that one stud. She is sturdy now.
Garage deck plywood in the works.
 

Attachments

  • E49E37CC-FF49-499F-AB35-747225593A5A.jpeg
    E49E37CC-FF49-499F-AB35-747225593A5A.jpeg
    1.2 MB · Views: 81
  • FEE10B9C-1830-4999-9234-BFC573CAE791.jpeg
    FEE10B9C-1830-4999-9234-BFC573CAE791.jpeg
    1.3 MB · Views: 86
  • 8D3537AE-88AA-425E-B992-FB50913FAD5F.jpeg
    8D3537AE-88AA-425E-B992-FB50913FAD5F.jpeg
    1.1 MB · Views: 87
  • 1850BCC6-4A23-4596-9D97-58CF664E075F.jpeg
    1850BCC6-4A23-4596-9D97-58CF664E075F.jpeg
    677 KB · Views: 83
  • 3B2394A7-3832-46E5-B09E-77E42BDF0B91.jpeg
    3B2394A7-3832-46E5-B09E-77E42BDF0B91.jpeg
    426.6 KB · Views: 82
  • CFA22FC7-26A1-4980-BC1D-5DEAE1D418BF.jpeg
    CFA22FC7-26A1-4980-BC1D-5DEAE1D418BF.jpeg
    380.6 KB · Views: 84
  • 72E90FA0-D5E5-426F-BE12-3C21860E90F5.jpeg
    72E90FA0-D5E5-426F-BE12-3C21860E90F5.jpeg
    747.5 KB · Views: 80
  • BABD07CB-6D18-4A10-9CE5-C12BF754CC8B.jpeg
    BABD07CB-6D18-4A10-9CE5-C12BF754CC8B.jpeg
    849.2 KB · Views: 85
  • BCB17D87-4C76-4844-85BB-313C0DB2E336.jpeg
    BCB17D87-4C76-4844-85BB-313C0DB2E336.jpeg
    628.9 KB · Views: 78
  • 0A8EEF04-C534-4916-A50D-C15343E391D0.jpeg
    0A8EEF04-C534-4916-A50D-C15343E391D0.jpeg
    654.2 KB · Views: 77
  • 7C771A3A-10A6-40AC-9963-C20153B598A3.jpeg
    7C771A3A-10A6-40AC-9963-C20153B598A3.jpeg
    521.3 KB · Views: 76
  • BCA165E4-1CF0-4AF5-8CF6-35D204D7B8A4.jpeg
    BCA165E4-1CF0-4AF5-8CF6-35D204D7B8A4.jpeg
    511.5 KB · Views: 71
  • F0B01765-0BDF-49EC-9C78-A5DE1FD82E7B.jpeg
    F0B01765-0BDF-49EC-9C78-A5DE1FD82E7B.jpeg
    411.6 KB · Views: 74
  • C42F5F04-ABDE-4516-865F-55C3BA378CF5.jpeg
    C42F5F04-ABDE-4516-865F-55C3BA378CF5.jpeg
    809.1 KB · Views: 80

DoughBallin14

Well-Known Member
Joined
Apr 22, 2014
Messages
973
Reaction score
1,157
Ah man i forgot to show you guys my own user error on my beater truck!! So i always knew the ladder on the front cap of the trailer was close to my cab on the driver side. I usually pay good attention to it until i adjusted the gooseneck height and i always planned on trimming down the ladder to suck it in closer to the cap.

Well it got the best of me and one step just kissed the corner of my back glass and pop there it went 🤦🏽‍♂️

That was last weekend putting it into storage. Got the window replaced quick and a good price thanks to all star auto glass in Temecula.
Safelite was a laughing joke when i called them. Which was expected.

Now i adjusted the gooseneck up and used my 4” offset ball from bw and cut the ladder down now i got plenty of room.
 

Attachments

  • F06BEE22-9B56-4393-8819-6C61042D86EF.jpeg
    F06BEE22-9B56-4393-8819-6C61042D86EF.jpeg
    649.8 KB · Views: 80
  • A6729C27-DC7C-49C1-B170-AEFDE8EA0155.jpeg
    A6729C27-DC7C-49C1-B170-AEFDE8EA0155.jpeg
    535.6 KB · Views: 83

Bowtiepower00

Well-Known Member
Joined
Apr 20, 2015
Messages
2,368
Reaction score
3,739
Nice work! Sucks about the tow rig.

If you haven’t, I would definitely recommend some roof vent covers like this:
6D54BFEE-EA8E-4706-9188-6C2C0DD5B1BE.jpeg

These will keep the sun from ruining your current vents, so they don’t rip off in the middle of a cross country trip, ask me how I know!
 

DoughBallin14

Well-Known Member
Joined
Apr 22, 2014
Messages
973
Reaction score
1,157
Nice work! Sucks about the tow rig.

If you haven’t, I would definitely recommend some roof vent covers like this:
View attachment 1187514
These will keep the sun from ruining your current vents, so they don’t rip off in the middle of a cross country trip, ask me how I know!
Haha agreed those are on the list i was going to ask around about some of the styles and colors white vs black etc. how have these been for you?

I need to replace the three vent caps as well. Which i have 2 black ones left over from the other trailer i did 2 years ago. These old ones are very brittle and are missing the little seals.

Glad it wasnt on the new truck and this truck was just a plain window. No slider or heat.
 

Bowtiepower00

Well-Known Member
Joined
Apr 20, 2015
Messages
2,368
Reaction score
3,739
Haha agreed those are on the list i was going to ask around about some of the styles and colors white vs black etc. how have these been for you?

I need to replace the three vent caps as well. Which i have 2 black ones left over from the other trailer i did 2 years ago. These old ones are very brittle and are missing the little seals.

Glad it wasnt on the new truck and this truck was just a plain window. No slider or heat.
I have used the “max air” brand in both white and black, the black blocks out a little more light. I’d go with whatever matches your roof. They do block your ability to fully open your vents, but you can still open them 3-4 inches or so. I usually keep my bathroom vent open with fan running whenever we’re using the trailer.

They make bigger, fancier ones that allow you to open vents further, but the basic ones are always in stock and usually pretty cheap.
 

SoCalDave

Well-Known Member
Joined
Jul 1, 2011
Messages
12,684
Reaction score
28,572
Yep boys we got a problem haha! This is slide all the way out
I'd be willing to wager that there have been more "destroyed floors in travel trailers" from wet/damaged wheel wells than from any other "my entire floor is soft and molded" complaints. That Darco (cheap polyethylene tarp type materiel) used on the bottom of some trailers (my 2018 included) was the worst thing a manufacturer could have used. I was doing some research after I had noticed a large section was damaged/missing on my trailer from the previous owners blowout. Man if I had taken it out on the road like that and caught a good rain storm my floor would have absorbed all that moister into the foam filling and it all starts from there. I went back and installed 1/4" Starboard material under all the exposed areas where the Darco material had been applied (basically frame out to sides) and then sealed all the joints with black silicon. If nothing else at least seal it with some automotive undercoating or truck bed liner type spray.
It appears you got the brunt of it fixed properly. Hope thing go a little smoother for ya going forward.
 

Attachments

  • 20220521_110710.jpg
    20220521_110710.jpg
    128.6 KB · Views: 62

DoughBallin14

Well-Known Member
Joined
Apr 22, 2014
Messages
973
Reaction score
1,157
I'd be willing to wager that there have been more "destroyed floors in travel trailers" from wet/damaged wheel wells than from any other "my entire floor is soft and molded" complaints. That Darco (cheap polyethylene tarp type materiel) used on the bottom of some trailers (my 2018 included) was the worst thing a manufacturer could have used. I was doing some research after I had noticed a large section was damaged/missing on my trailer from the previous owners blowout. Man if I had taken it out on the road like that and caught a good rain storm my floor would have absorbed all that moister into the foam filling and it all starts from there. I went back and installed 1/4" Starboard material under all the exposed areas where the Darco material had been applied (basically frame out to sides) and then sealed all the joints with black silicon. If nothing else at least seal it with some automotive undercoating or truck bed liner type spray.
It appears you got the brunt of it fixed properly. Hope thing go a little smoother for ya going forward.
1000% agree that this design of “waterproofing “ is horrible and definitely just enough to get them past most warranty periods..

I was thinking of bed spray or flex seal spray haha something to waterproof better that material. I could possible get our fab guy at work to make me a fender out of sheet aluminum or steel maybe. He already is going to be in there fixing a small cracked shackle weld i found.
 

DoughBallin14

Well-Known Member
Joined
Apr 22, 2014
Messages
973
Reaction score
1,157
I have used the “max air” brand in both white and black, the black blocks out a little more light. I’d go with whatever matches your roof. They do block your ability to fully open your vents, but you can still open them 3-4 inches or so. I usually keep my bathroom vent open with fan running whenever we’re using the trailer.

They make bigger, fancier ones that allow you to open vents further, but the basic ones are always in stock and usually pretty cheap.
Thanks for the input i was thinking the basic maxx air ones but maybe doing one of the max air cover ones with the built in fantastic fan one for the garage area or just add a fan one and put a basic maxair cover on.
 
Top