WELCOME TO RIVER DAVES PLACE

Transom Hardware

BassLakeCruiser

Well-Known Member
Joined
Apr 10, 2017
Messages
552
Reaction score
475
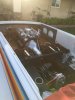
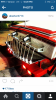
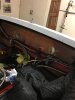
Looking for ideas on transom hardware and color configurations if any. Planning to update the original hardware to do fading ano, tolerance issue and some corrosion/erosion. Would like to move the cav rod further back just enough to clear my control arm and then add that length to the new plates to keep the geometry. If you guys could share some pictures and where your products came from it would help with some ideas. I would like to have some red ano in the mix somewhere but haven't decided where. Will be making new plate and purchasing transom bearing and plate pads. Current plates are 9.5-11"
 

BassLakeCruiser

Well-Known Member
Joined
Apr 10, 2017
Messages
552
Reaction score
475
21DE419B-95C5-4B4D-A065-AD251D5144E5.jpeg
8A4C354A-3C18-48ED-B658-DA4ADE96352E.jpeg
 

oldschool

Well-Known Member
Joined
Nov 1, 2007
Messages
8,838
Reaction score
11,044
I powder coated the cav plates and transom piece on my Hallett, the rest is stainless and polished aluminum. The PC has held up really well, about 15 years. I will never anodize transom parts again. I need to re anodize some deck pieces though. I think the ano looks better than PC, but doesn't hold up in the water. AnoTech in Clovis is good for anodize.
 

cofooter

Well-Known Member
Joined
Apr 30, 2012
Messages
5,641
Reaction score
9,133
I powder coated the cav plates and transom piece on my Hallett, the rest is stainless and polished aluminum. The PC has held up really well, about 15 years. I will never anodize transom parts again. I need to re anodize some deck pieces though. I think the ano looks better than PC, but doesn't hold up in the water. AnoTech in Clovis is good for anodize.
Got pics of the anodized HW?
 

overpriced hallet

Well-Known Member
Joined
Jul 29, 2009
Messages
877
Reaction score
347
Just some ideas
 

Attachments

  • 51A7B09C-72C7-49BC-948F-BBF7C6BDA4E5.jpeg
    51A7B09C-72C7-49BC-948F-BBF7C6BDA4E5.jpeg
    99.1 KB · Views: 360
  • B8848DEE-79DD-43B5-9FD8-C0D6E8AAA918.jpeg
    B8848DEE-79DD-43B5-9FD8-C0D6E8AAA918.jpeg
    49.4 KB · Views: 346
  • D4B75E22-6DBD-4944-A941-F19854CC88CA.jpeg
    D4B75E22-6DBD-4944-A941-F19854CC88CA.jpeg
    122.4 KB · Views: 360
  • 163B980C-1F34-4331-AE46-8F02D988DE5A.jpeg
    163B980C-1F34-4331-AE46-8F02D988DE5A.jpeg
    90 KB · Views: 324
  • 649F9F61-64E7-4905-808E-80F0E47E0D10.jpeg
    649F9F61-64E7-4905-808E-80F0E47E0D10.jpeg
    78.1 KB · Views: 338
  • 3C3736F9-2140-4A87-945C-517A34B832E0.jpeg
    3C3736F9-2140-4A87-945C-517A34B832E0.jpeg
    101.4 KB · Views: 326

overpriced hallet

Well-Known Member
Joined
Jul 29, 2009
Messages
877
Reaction score
347
A couple others
 

Attachments

  • 612FE47C-8006-483D-AD62-7C16E298927B.png
    612FE47C-8006-483D-AD62-7C16E298927B.png
    778.2 KB · Views: 358
  • 0135FE14-5CE3-4FD4-AE2A-43BA49B68D74.jpeg
    0135FE14-5CE3-4FD4-AE2A-43BA49B68D74.jpeg
    145 KB · Views: 369

footer

looking for a v-drive
Joined
Aug 26, 2009
Messages
597
Reaction score
470
What are your thoughts on integrating the platform brackets with the rod brackets?
 

oldschool

Well-Known Member
Joined
Nov 1, 2007
Messages
8,838
Reaction score
11,044
What are your thoughts on integrating the platform brackets with the rod brackets?
Mine swim platform is tied to the plates and rod only. So it moves with the electric plates, which don't have much movement.
 

oldschool

Well-Known Member
Joined
Nov 1, 2007
Messages
8,838
Reaction score
11,044
I’m not opposed to it. Just would need to be put in touch w the right guy to do it
It's not hard, I did it on mine. You just need someone who can do some machining and a little fab work. You can kinda see how I did it in the pics in my previous post.
 

BassLakeCruiser

Well-Known Member
Joined
Apr 10, 2017
Messages
552
Reaction score
475
I’ve seen one pc supports and blocks integrated together. Thought that’s what he meant. I’m ok with how the swim step is now, just needs a fresh polish
 
Last edited:

BamBam

Well-Known Member
Joined
May 14, 2008
Messages
1,062
Reaction score
650
All stainless is the way to go.
Your transom blocks look like they are upside down currently. You want the geometry to push down on the plates not out. By adding the length to the plates as you stated you wanted to do you will need to add length to the transom blocks. You might also consider raising the entire assembly when going with longer plates to keep the geometry correct. Notice the angle of your turn buckles as opposed to the ones posted by Overpriced Hallet, Oldschool and SFV2RVR? Those set-ups also use longer stand-offs adding to the throw of the plates. I don't have any pics of mine but it is all stainless and the only way to go if you are tearing into it.
The "snowball" comment has more to do with what this project will become not the mess it is right now. Change one thing... plan to change a whole bunch more.
 

BassLakeCruiser

Well-Known Member
Joined
Apr 10, 2017
Messages
552
Reaction score
475
I thought the blocks placed like that were funny as well but by the looks of it I don’t think the control arm is long enough if they were flipped 180. My snowball started the second the motor came out and gave me access to things.

The ideas of lengthening and changing things are great but I’m currently working with a ski boat motor and think it would hurt more than help by hanging 13” stainless plates out the back
 

BassLakeCruiser

Well-Known Member
Joined
Apr 10, 2017
Messages
552
Reaction score
475
All stainless is the way to go.
Your transom blocks look like they are upside down currently. You want the geometry to push down on the plates not out. By adding the length to the plates as you stated you wanted to do you will need to add length to the transom blocks. You might also consider raising the entire assembly when going with longer plates to keep the geometry correct.

I’m wanting to add length to the blocks to let the control arm clear. Then would add that same amount to the new plates to keep said geometry.
 

BamBam

Well-Known Member
Joined
May 14, 2008
Messages
1,062
Reaction score
650
In my opinion, I would copy the plates if you want new ones. Doing that will keep all of the centerlines where they are. If you were to put transom blocks with a profile the same as what you did on your Flatty, you would put your cav. rod (crossbar) at about the same height it is now, but further from the transom giving you the clearance you're looking for. That should stand the turnbuckles up a little bit giving you better motion of the plates through their throw. I agree that you don't need longer plates with your current power set-up, I mis-understood your initial post.
 

BassLakeCruiser

Well-Known Member
Joined
Apr 10, 2017
Messages
552
Reaction score
475
And if you notice my turnbuckles are just about as short as they can be. So if I flipped the new blocks I think I would be better off anyway. I’m sure this is the original equipment from 81 and the aluminum shows it.

All of my resources are aluminum products, so who would I contact for stainless blocks, pads and maybe control arm? Fantasy, Racey, D21, Schiada, Alexi? But I’m sure the answer will be ALL.
 

X Hoser

Well-Known Member
Joined
Nov 2, 2011
Messages
1,666
Reaction score
1,729
And if you notice my turnbuckles are just about as short as they can be. So if I flipped the new blocks I think I would be better off anyway. I’m sure this is the original equipment from 81 and the aluminum shows it.

All of my resources are aluminum products, so who would I contact for stainless blocks, pads and maybe control arm? Fantasy, Racey, D21, Schiada, Alexi? But I’m sure the answer will be ALL.
They all make really nice stuff. I bought a lot of my parts from Bergeron Marine in AZ
 

thetub

Well-Known Member
Joined
May 30, 2008
Messages
3,689
Reaction score
2,980
why not try and use longer tie rods (dont know if thats correct name) the part where you slip the clevis pins and attach turnbuckles at the top near the transom top?

I did this and gained some clearance for the control arm and just make the turnbuckles little longer ?

this might just give you enough clearance you are looking for without alot of headache of changing blocks and plates etc...?
 
Last edited:

BassLakeCruiser

Well-Known Member
Joined
Apr 10, 2017
Messages
552
Reaction score
475
update for you all. Stainless hardware has been ordered and will have a local shop build the stainless plates soon. Flipping the pillowblocks and adding longer eyelevers to stand up the turnbuckles to a steeper angle.

motor is at the machine shop so addressing everything I can while its out. Removed KB valve covers and huge puke tank and bracket out back...cleaned things up real good.

Rigging is loose without motor plates holding things together and the floor access covers have been carpeted over. Trying to decide if I want to remove the carpet under the hatch only and polish the balsa floors, make a bit bigger cover, or try to trim the carpet just enough to remove and re-use the current covers.
 

BassLakeCruiser

Well-Known Member
Joined
Apr 10, 2017
Messages
552
Reaction score
475
8ACFF4B7-E6C7-4A3F-92E9-1A88C5047D66.jpeg 4B97EC1D-94C1-459B-A765-F4E6EA4A492E.jpeg Plenty of capacity for all the blowby

Forgot to add the pic of after
 

Attachments

  • FBBFA521-0FEC-4BE4-933A-E2AAD888F6EB.jpeg
    FBBFA521-0FEC-4BE4-933A-E2AAD888F6EB.jpeg
    130.1 KB · Views: 211
Last edited:

thetub

Well-Known Member
Joined
May 30, 2008
Messages
3,689
Reaction score
2,980
update for you all. Stainless hardware has been ordered and will have a local shop build the stainless plates soon. Flipping the pillowblocks and adding longer eyelevers to stand up the turnbuckles to a steeper angle.

motor is at the machine shop so addressing everything I can while its out. Removed KB valve covers and huge puke tank and bracket out back...cleaned things up real good.

Rigging is loose without motor plates holding things together and the floor access covers have been carpeted over. Trying to decide if I want to remove the carpet under the hatch only and polish the balsa floors, make a bit bigger cover, or try to trim the carpet just enough to remove and re-use the current covers.

thats what i meant. Eyelevers . getting old losing my marbles...

glad it worked out
 
Last edited:

BassLakeCruiser

Well-Known Member
Joined
Apr 10, 2017
Messages
552
Reaction score
475
3A742938-0AD5-4C3C-9DF8-A175D112D9D5.jpeg 69DAD8EA-5D4F-4ED1-86BA-3E2DE003BFB4.jpeg 5FA49E41-07FF-482A-8A40-89C55D8CA0BC.jpeg 0BA2DE10-D390-4C15-B0ED-A987016866CF.jpeg 101A99E4-DC18-41BC-A9AF-16F245CFCB6E.jpeg 13377E16-E41A-4DD3-9725-A070566BC9AA.jpeg FE38D79E-8E18-4F0C-8623-8FC695932EEE.jpeg Picture update as we should have a new short block this week as well as plates. Ended up doing a few extras since the motor took so long and now have started reassembly. It’s taking a lot of patients seeing people on the water already, or having a complete boat. I’ll get a few more up later.
 

025

Well-Known Member
Joined
Jul 23, 2011
Messages
863
Reaction score
209
I prefer all stainless. Maintainence is easy and finish is durable, corrosion resistant. Machining is really time consuming though
 

Attachments

  • IMG_2552.JPG
    IMG_2552.JPG
    128.4 KB · Views: 257

Backlash

Well-Known Member
Joined
Jan 14, 2011
Messages
13,728
Reaction score
25,966
025 your boat is a work of art. Maintaining it will be a breeze too. ;)
 

BassLakeCruiser

Well-Known Member
Joined
Apr 10, 2017
Messages
552
Reaction score
475
CE4063F1-55CB-4256-8B6D-6CD5E2120F4C.jpeg 8E4ED4D8-F714-4741-A590-B237C35A0A1E.jpeg Goal is to be on the water the weekend after next, Millers Boat show at Bass Lake. If the rain ever stops in the valley we can get the boat out and put the plates on. For now the faded ano is updated and some transom parts are up.
 
Last edited:

BassLakeCruiser

Well-Known Member
Joined
Apr 10, 2017
Messages
552
Reaction score
475
We wrapped the boat up last week 1 evening before leaving for the Bass Lake Boat Show. Everything came out perdy bitchen for a quick clean up. We re-ano'd a lot of parts, polished lots of parts, rebuilt a motor, pulled carpet to expose balsa, re-did the transom and other odds and ends and some general cleaning. I'll post up how things came out but the pictures aren't the best but you'll get the idea. There are a few items still in the works with Bergeron but we will get that done soon enough. Im almost positive the inside and rigging on the boat hasn't been this clean since new.

Vendors used aside from the obvious common places;

Bergoron for most cav related items
Dale Brisco Inc in Fowler Ca lasered the plates
AnoTech Anodizing Fresno
Caps Coatings Fresno
Imperial Custom Polishing Fresno
Daves Performance Machining
 
Last edited:
Top