WELCOME TO RIVER DAVES PLACE

Cobra!

Guest

Director...
Joined
Sep 13, 2007
Messages
27,539
Reaction score
3,323
This is an in progress....(slow progress)...resto on my Cobra.....currently #2 in line behind a boat in fixing up....
********************************************************

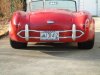
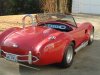
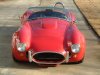
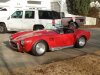
So I wind up with this Cobra....Nice Car...lots of power....red all over......It needs some changes..

Car Specs...
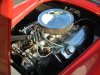
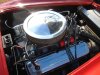
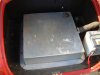
Fiberglass body on full tube frame....Fuel cell and battery in trunk...Mustang 2 front end with tubular cross bar....very nice chassis....4 link Alston Rear ...coil overs and disc brakes on all 4 corners....466 full roller Ford.. C6 trans.. and a 410 Detroit locker rear end....Definately a stout package... The car is tight and launches VERY hard....No heater no stereo no wipers ....just fast...

What will change....
I like my Cobras to be blue.....So I will be smoothing the body,and taking care of a few spider cracks before painting it sunset blue pearl with a white stripe...
The car came with a hideous Pinto/Mustang 2 shifter that has to go...I bought a Hurst Quarter stick shifter for it ....
The engine compt will be detailed .......The chassis will be detailed and painted as well...
The Sidepipes and headers are hot coated
I will be posting the progress...
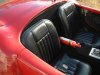
Here are the before Pics...
 

Attachments

  • 181DSCF0013co.jpg
    181DSCF0013co.jpg
    112.4 KB · Views: 535
  • 181DSCF0023co.jpg
    181DSCF0023co.jpg
    116.5 KB · Views: 716
  • 181DSCF0022co.jpg
    181DSCF0022co.jpg
    117.9 KB · Views: 930
  • 181DSCF0021co.jpg
    181DSCF0021co.jpg
    119.5 KB · Views: 518
  • 181DSCF0020co.jpg
    181DSCF0020co.jpg
    104.8 KB · Views: 515
  • 181DSCF0019co.jpg
    181DSCF0019co.jpg
    102.4 KB · Views: 803
  • 181DSCF0018co.jpg
    181DSCF0018co.jpg
    122.9 KB · Views: 530
  • 181DSCF0015co.jpg
    181DSCF0015co.jpg
    90.1 KB · Views: 539
Last edited:

Guest

Director...
Joined
Sep 13, 2007
Messages
27,539
Reaction score
3,323
Disassembly and damage repair ...Paint prep

181DSCF0005dis.jpg
 

Guest

Director...
Joined
Sep 13, 2007
Messages
27,539
Reaction score
3,323
Some damage below the trunk will need to be addressed..

181DSCF0006dis.jpg
 

Guest

Director...
Joined
Sep 13, 2007
Messages
27,539
Reaction score
3,323
If they all came apart this easy...
Only thing left is the Headers/Sidepipes...and fuel filler..

181DSCF0009dis.jpg
 

Guest

Director...
Joined
Sep 13, 2007
Messages
27,539
Reaction score
3,323
Got various spider cracks to repair.....and a bad low area in the front between the fenders where a bulkhead is...

181DSCF0012dis.jpg

181DSCF0011dis.jpg
 

Guest

Director...
Joined
Sep 13, 2007
Messages
27,539
Reaction score
3,323
OK the previous owner backed into a tree and crushed below the trunk latch....crushing and cracking the glass....I am gonna grind it inside and out vee out all the cracks and lay in some mat and resin to try and build some strength back up...Here is the area that took the hit after grinding..


181DSCF0020dis.jpg

181DSCF0021dis.jpg
 

Guest

Director...
Joined
Sep 13, 2007
Messages
27,539
Reaction score
3,323
Here are the materials needed ...some resin...mat ...plastic mixing cup, stir sticks,and gloves...

181DSCF0022dis.jpg
 

Guest

Director...
Joined
Sep 13, 2007
Messages
27,539
Reaction score
3,323
Cut the mat into the size strips you need ...before you mix the resin up...

181DSCF0023dis.jpg

A disposable paint pan liner makes an excellent place to wet out the mat....I brushed a coat of resin on the damaged areas....after wiping them with acetone on a rag ....then wet out and apply the layers of mat

181DSCF0024dis.jpg

181DSCF0025dis.jpg
 

Guest

Director...
Joined
Sep 13, 2007
Messages
27,539
Reaction score
3,323
The hit was so hard that it also took out the back up plate & latch inside the trunk lid for the handle...this will need some repair as well...


181DSCF0026dis.jpg
 

Guest

Director...
Joined
Sep 13, 2007
Messages
27,539
Reaction score
3,323
Moving to the front there is a suspect looking crack and a bad low spot between the front fenders....after grinding the crack...and about
1/2 inch of bondo I found where the front of the body is riveted to the frame cage and the glass pulled down....I will grind the bondo out and replace it with some mat and resin.....and then a skim coat of bondo....

181DSCF0027dis.jpg

181DSCF0028dis.jpg


Resin/Mat applied...

181DSCF0029dis.jpg

181DSCF0030dis.jpg
 

Guest

Director...
Joined
Sep 13, 2007
Messages
27,539
Reaction score
3,323
Repairs are coming along and all follow the same pattern...Glass mat and resin, bondo, glazing putty.....The rear is done ...Im waiting for the new grommets to show up to finish cutting the holes for the bumper bars....
Also here are a couple of the many test plates I painted trying to find the right color...

181DSCF0039td.jpg


Probably gonna come down to one of these two...dark blue metallic pearl...or platinum silver pearl...

181DSCF0042td.jpg
 

Guest

Director...
Joined
Sep 13, 2007
Messages
27,539
Reaction score
3,323
Been chipping away at the structural repairs in between customer junk...The side vents were held in place with rivets buried in bondo....they are not going back that way so I filled the holes....

181DSCF0051td.jpg

You can see upon blocking the filler down the low spots between the upper rivets...those will have to be filled and sanded smooth as well

A shot thru the vent area looking at the headers...a little dusty at the moment

181DSCF0052td.jpg


Large repair in front almost ready for primer...

181DSCF0053td.jpg

There were some stress cracks from flexing ...and some porosity in the gel...lots of large air gaps to fill and block...


181DSCF0055td.jpg

The back is ready..

181DSCF0056td.jpg

181DSCF0057td.jpg

A shot of the vents after some quality time with the bead blaster...

181DSCF0058td.jpg

181DSCF0054td.jpg
 

Guest

Director...
Joined
Sep 13, 2007
Messages
27,539
Reaction score
3,323
So Im lookin at this thing last nite ....deciding where to get back to work first ....and I look at an area that had a bump in it that was giving me fits .....and It looks worse than ever ...I have been trying to smooth this area by sanding with a block at the transition from the fender to the wheel flare....I poked it with my finger ...and my finger just about went through it!...sanded a bit much it would appear...This must have been one of the first cars out of the mold ..because this area was very thin....so off comes the wheel to investigate...

181DSCF0165.jpg
 

Guest

Director...
Joined
Sep 13, 2007
Messages
27,539
Reaction score
3,323
Here is a shot of my extra cool removable inner fender liners...

181DSCF0167ss.jpg

and a shot of it removed....I know the engine looks ugly ...It will be removed and painted after the body is done...


181DSCF0168.jpg
 

Guest

Director...
Joined
Sep 13, 2007
Messages
27,539
Reaction score
3,323
This is a shot looking up at the thin area,without any flash...the shop lights are illuminating the thin spot ....obviously....lol....this is gonna have to be built up from in here...

181DSCF0173.jpg

Since I will be working on my back upside down and there is gonna be a lot of dust ..I outline the area to be ground down....so I dont lose my reference...use plain chalk...not dustless or squeak free...they contain waxes which inhibit adhesion...

181DSCF0171.jpg
 

Guest

Director...
Joined
Sep 13, 2007
Messages
27,539
Reaction score
3,323
Safety gear....Since I will be on my back, a face shield,respirator ...long sleeve shirt and gloves are required...a 3 in grinder with a 36 grit disk will make short work of this

181DSCF0170.jpg

Area ground down ...after grinding always blow the dust and wipe with a clean cloth with Acetone..


181DSCF0174-med.jpg
 

Guest

Director...
Joined
Sep 13, 2007
Messages
27,539
Reaction score
3,323
The usual repair materials...

181DSCF0175.jpg

Here are the 4 layers going on...I wet the ground area with resin first and apply the smallest patch and wet it out with a cut off 2 in brush....the successive layers ar wet out together on a piece of wax paper and squeegied into place behind the first patch.....more to follow

181DSCF0176.jpg
 

Guest

Director...
Joined
Sep 13, 2007
Messages
27,539
Reaction score
3,323
Ok finished up the backing into the tree damage...the inner side of the trunk was damaged as it hit on the handle....damage repaired and new hardware mocked up.

181DSCF0001kk.jpg
 

Guest

Director...
Joined
Sep 13, 2007
Messages
27,539
Reaction score
3,323
To give you an Idea of what Im dealing with here ....the major damage and all the cracks have been fixed ...now its time to attempt to block down the rest of the body to prepare for primer...normally a flat stiff block is used to block flat surfaces.....this car does not have a flat panel on it anywhere...so I have to use a hard rubber block with enough give to it ,to conform to the shape of the surface.....I knew when I rubbed my hand over the trunk I was in trouble.......the picture below is pretty telling....the red areas are paint ....low spots the yellow is primer and the white is bondo....I am blocking with 100 grit paper.....this is how wavy the original painter left the surface of this car.....this is the time consuming and expensive part of car prep for paint....as a side note ..I spoke to the guy who built this car this week to get some specs on the build up....When I mentioned I was painting it he told me when he built it he paid the painter 8k to paint it.....and there is not a straight panel on the car...lol...more to come..


181DSCF0003kk.jpg
 

Guest

Director...
Joined
Sep 13, 2007
Messages
27,539
Reaction score
3,323
more block sanding.....leveling

The circled areas are low and need filler

181DSCF0006yy.jpg

filled.

181DSCF0007yy.jpg
 

Guest

Director...
Joined
Sep 13, 2007
Messages
27,539
Reaction score
3,323
The trunk and hood are straight...finally....I have made the decision,because of how wavy every inch of this car is....that all the old laquer paint has got to come off...laquer paint is no longer used,and is not compatible with the solvents in todays paints...you can bury it in sealer and primer and hope for the best....or remove it...to be on the safe side I am blocking the entire car with #80 paper on long blocks till its all gone....laquer is thick by nature....and its tough paint...and stinks when sanded off...the upside is that it makes a great guide coat...that is,as you block areas the low spots will become readily apparent as the only red left......most of the lumps and bumps are coming out this way...and little filler is required ...so far.....this body has a few high spots to deal with as well....in this pic the low and high spots in the door are becoming obvious


181DSCF0001de.jpg
 

Guest

Director...
Joined
Sep 13, 2007
Messages
27,539
Reaction score
3,323
Right rear ...now smooth and free of laquer ....

181DSCF0002de.jpg
 

Guest

Director...
Joined
Sep 13, 2007
Messages
27,539
Reaction score
3,323
While block sanding that area I was being lazy and didnt remove the gas filler...I was going to,but got involved in sanding and figured if I was careful enough I wouldn't hit it with the sanding block...........wrong.......I got the fuel filler back from the chrome shop today...they did a nice job of rechroming it and removing my scratches......a $90 mistake

181DSCF0003de.jpg
 

Guest

Director...
Joined
Sep 13, 2007
Messages
27,539
Reaction score
3,323
I was also wanting to chrome the side vents as well...but since they are welded together and cant be disassembled none of the chrome shops would do it....So I decided to give a new on the market chrome paint a try.....a lot of steps to it.....and when finished it has more of a look of polished aluminum.....

181DSCF0004de.jpg
 

Guest

Director...
Joined
Sep 13, 2007
Messages
27,539
Reaction score
3,323
Trunk...straight smooth and fitted...

181DSCF0005de.jpg
 

Guest

Director...
Joined
Sep 13, 2007
Messages
27,539
Reaction score
3,323
Well ...I had the hood straightened and ready for final primer.....with my cowl induction scoop...and Brown pitched such a fit about the look...I decided to rethink the scoop Idea......The new sheet metal scoop...


181DSCF0006cc.jpg
 

Guest

Director...
Joined
Sep 13, 2007
Messages
27,539
Reaction score
3,323
Nothing the sawzall cant handle...

saw.JPG

done

181DSCF0008cc.jpg
 

Guest

Director...
Joined
Sep 13, 2007
Messages
27,539
Reaction score
3,323
Hood in place.....looks like the air cleaner is history... The distributor is tall as well...It has the MSD built into its base...

181DSCF0009cc.jpg

A little bondo...It will be good as new..... ...lol

181DSCF0010cc.jpg
 

Noisy Nova

Well-Known Member
Joined
Sep 25, 2007
Messages
114
Reaction score
1
Damn, I wish I knew how to do that kind of work. I have the shop but not the skills to go with it. :mad:
 

Guest

Director...
Joined
Sep 13, 2007
Messages
27,539
Reaction score
3,323
Ok so I got this hole in the hood to close up...I have a friend in the Airline business who gave me a roll of Kevlar.....very strong....gonna use it on this...

181DSCF0011cc.jpg
 

Guest

Director...
Joined
Sep 13, 2007
Messages
27,539
Reaction score
3,323
thin board from Home Depot ...cut to size will follow the curve of the hood nicely.....I use contact cement and wax paper ...and then screw the board to the outside of the hood......sort of giving me a mold to lay some glass in...

181DSCF0015cc.jpg

screwed in place...I will fix the holes left by the screws later...


181DSCF0016cc.jpg
 

Guest

Director...
Joined
Sep 13, 2007
Messages
27,539
Reaction score
3,323
Underside view....ready to lay in some glass...

181DSCF0017cc.jpg

some of the stuff needed...the yellow roll is Kevlar....I am gonna alternate layers of mat and Kevlar


181DSCF0018cc.jpg
 

Guest

Director...
Joined
Sep 13, 2007
Messages
27,539
Reaction score
3,323
Kevlar...hard to cut ...you need special scissors......which I didn't have at the time...
181DSCF0020cc.jpg
 

Guest

Director...
Joined
Sep 13, 2007
Messages
27,539
Reaction score
3,323
6 Layers later.....It looks like this...


181DSCF0022cc.jpg
 

Guest

Director...
Joined
Sep 13, 2007
Messages
27,539
Reaction score
3,323
Add heat....let cure overnight

181DSCF0024cc.jpg

After its cured I will lay some glass on the topside on the seam area.....and then re cut the hole for the air cleaner.....a smaller one this time....

This old school Edelbrock unit is the only one I have found that will fit...


181DSCF0021cc.jpg
 

Guest

Director...
Joined
Sep 13, 2007
Messages
27,539
Reaction score
3,323
out of the mold...so to speak....

181DSCF0025cc.jpg
 

Guest

Director...
Joined
Sep 13, 2007
Messages
27,539
Reaction score
3,323
Next I used a small grinder and dished out a 3 in area right at the seam to lay in a few layers of glass mat on the topside....to help prevent any stress cracks

181DSCF0030cc.jpg

Glass layed in on the topside


181DSCF0031cc.jpg
 

Guest

Director...
Joined
Sep 13, 2007
Messages
27,539
Reaction score
3,323
lay out the new hole to clear the distributor and air cleaner...and cut with the jigsaw..

181DSCF0042.jpg
 

Guest

Director...
Joined
Sep 13, 2007
Messages
27,539
Reaction score
3,323
Ladies and Gentlemen....The Doors....

The one behind is ready for primer...the one in the foreground is being blocked smooth

181DSCF0046n.jpg

Lots of side impact protection here....at 10 1/2 lbs each....lol..


181DSCF0045n.jpg
 

Lue

Banned
Joined
Sep 21, 2007
Messages
3,387
Reaction score
15
Very awsome Brian. Keep posting the progress.
 

DaveA

Raysoncrafter
Joined
Dec 23, 2007
Messages
22
Reaction score
2
I was also wanting to chrome the side vents as well...but since they are welded together and cant be disassembled none of the chrome shops would do it....So I decided to give a new on the market chrome paint a try.....a lot of steps to it.....and when finished it has more of a look of polished aluminum.....

View attachment 507


It's nice to see that someone will take photos step by step of their project and take the time to post them for others. Thank you. Glad to see you're making progress!

What is this "new on the market chrome paint" you speak of?
I'm interested...
DaveA
 
Top