WELCOME TO RIVER DAVES PLACE


Project Edge Stealth Jet
- Thread starter Fonz69
- Start date

Fonz69
Well-Known Member
- Joined
- Jan 15, 2011
- Messages
- 374
- Reaction score
- 1,070
Bring one of yours along, there is space on my dock and you could checkout the WI RiverI might have to come over and see that thing run

Fonz69
Well-Known Member
- Joined
- Jan 15, 2011
- Messages
- 374
- Reaction score
- 1,070
I was able to get the new motor in the boat but not after some modifications. The bilge divider had to go as the the new motor has a larger kicked out oil pan. The rear motor mount plate was almost identical to my old one however the front causes the motor to sit more level than my previous plate. I had it setup before where the motor was tipped down 5 degrees in the back as the pump sits at 5 degrees nose up which kept my driveline angles parallel. Now the motor sits 1 degree back so the ujoint sees 4 degrees off of parallel 
It worked in the other Stealth without bad vibrations but time will tell what happens in mine.
Made the fuel pump bracket and had some help from my youngest
Still need to plumb the fuel line and fabricate brackets for the alternator but it’s getting close.


It worked in the other Stealth without bad vibrations but time will tell what happens in mine.
Made the fuel pump bracket and had some help from my youngest
Still need to plumb the fuel line and fabricate brackets for the alternator but it’s getting close.
HST4ME
Well-Known Member
- Joined
- Nov 9, 2015
- Messages
- 7,689
- Reaction score
- 18,064
4 Degrees isn't terrible. Gonna need some heat shield on the zoomies of on the side of the deck though.
Fonz69
Well-Known Member
- Joined
- Jan 15, 2011
- Messages
- 374
- Reaction score
- 1,070
Yeah they are close, we’re in a stealth before so4 Degrees isn't terrible. Gonna need some heat shield on the zoomies of on the side of the deck though.

Fonz69
Well-Known Member
- Joined
- Jan 15, 2011
- Messages
- 374
- Reaction score
- 1,070
Was able to get the alternator installed today. Had to mill off some of the lower mount on the alternator in order to get the alignment correct.
Then a few bushings to make and a longer belt. Seems pretty solid so hopefully it will hold true over 100 mph


Then a few bushings to make and a longer belt. Seems pretty solid so hopefully it will hold true over 100 mph
Fonz69
Well-Known Member
- Joined
- Jan 15, 2011
- Messages
- 374
- Reaction score
- 1,070
Rigged up a trigger switch and then a mechanical boost gauge that you can reset after each pass by a relief button.
Clearanced the zoomies so I could use studs and gave them a fresh coat.


Clearanced the zoomies so I could use studs and gave them a fresh coat.
Fonz69
Well-Known Member
- Joined
- Jan 15, 2011
- Messages
- 374
- Reaction score
- 1,070
So with the kicked out oil pan there is not enough room to use my drain valve or even remove the drain plug for that matter.

Out with the motor, bought a new type of hoist spreader.

Dropped the pan off with Harold Furo who is local and one hell of a fabricator. Definitely the guy to trust my high dollar pan with. He has done work with the Street Outlaw guys building their headers and other fabrications. Look him up if you need a killer set of pipes or any other fab work. FURO Racecraft 715-342-0300 or www.furoracing.com
Here he drilled out the location.

Then made an adapter that’s countersunk and dished out to improve oil flow out the drain valve.

Here is a view through the trapdoor inside the pan.

And on the outside.

Now back in the boat with plenty of room to attach the drain hose later.

Had my pit crew helping to add the oil and double check things.

Glad he approves

Stole a few dog toys and made some zoomie plugs.


Now time for the snow to melt…..
Out with the motor, bought a new type of hoist spreader.
Dropped the pan off with Harold Furo who is local and one hell of a fabricator. Definitely the guy to trust my high dollar pan with. He has done work with the Street Outlaw guys building their headers and other fabrications. Look him up if you need a killer set of pipes or any other fab work. FURO Racecraft 715-342-0300 or www.furoracing.com
Here he drilled out the location.
Then made an adapter that’s countersunk and dished out to improve oil flow out the drain valve.
Here is a view through the trapdoor inside the pan.
And on the outside.
Now back in the boat with plenty of room to attach the drain hose later.
Had my pit crew helping to add the oil and double check things.
Glad he approves
Stole a few dog toys and made some zoomie plugs.
Now time for the snow to melt…..
HST4ME
Well-Known Member
- Joined
- Nov 9, 2015
- Messages
- 7,689
- Reaction score
- 18,064
All our snow melted, now it's just shitty brown grass and dirt winter. :/
Fonz69
Well-Known Member
- Joined
- Jan 15, 2011
- Messages
- 374
- Reaction score
- 1,070
Dog days of winter lolAll our snow melted, now it's just shitty brown grass and dirt winter. :/
Fonz69
Well-Known Member
- Joined
- Jan 15, 2011
- Messages
- 374
- Reaction score
- 1,070
Drew Fab came up with a new spin on the steering pins for jet boats and I thought I’d give them a try. My steering wasn’t too bad before but I do know that the nyliner wear sleeves in the stock pins are susceptible to getting sand or tiny debris caught in them which makes your steering stiff.
You can buy these at several locations however I ended up going right to Drew for mine the first day he offered them. He offers just the pins or a kit that comes with all the drills and taps needed. https://drewbuilt.com/products/jet-drive-steering-pin-kit/
Here is my install.
Tapped the old pin screw holes for the supplied grease zerks.


Now for the HPH housing, the housing top was a little off as was the bottom. A few quick passes to take off .003 and were good to go.


After setting the pin in place I noticed that the small radius of the pin where it meets the base would keep the pin up off the housing by .018 and not let the base seat all the way.

Quick touch to make a slight radius inside the bore and its all good.

Now time to mark the holes with a transfer punch, I did take my time and do one at a time to make sure nothing moved.

Now my depth was only 3/8” so as to not break through which meant extra care not to burry my tap. I also used some antiseeze as these are stainless screws going into aluminum and when you add water I think we all know the end results over time. Make sure to grease the pins when you final assemble them.

 One other thing to note is if your diverter housing has any powder coating inside the pin holes you need to remove it so the new pin O rings fit properly. A small pump of grease in the zerks and your good to go.
You can buy these at several locations however I ended up going right to Drew for mine the first day he offered them. He offers just the pins or a kit that comes with all the drills and taps needed. https://drewbuilt.com/products/jet-drive-steering-pin-kit/
Here is my install.
Tapped the old pin screw holes for the supplied grease zerks.
Now for the HPH housing, the housing top was a little off as was the bottom. A few quick passes to take off .003 and were good to go.
After setting the pin in place I noticed that the small radius of the pin where it meets the base would keep the pin up off the housing by .018 and not let the base seat all the way.
Quick touch to make a slight radius inside the bore and its all good.
Now time to mark the holes with a transfer punch, I did take my time and do one at a time to make sure nothing moved.
Now my depth was only 3/8” so as to not break through which meant extra care not to burry my tap. I also used some antiseeze as these are stainless screws going into aluminum and when you add water I think we all know the end results over time. Make sure to grease the pins when you final assemble them.
Fonz69
Well-Known Member
- Joined
- Jan 15, 2011
- Messages
- 374
- Reaction score
- 1,070
Fuel system leak test and first ignition fire up today was a success!
Fonz69
Well-Known Member
- Joined
- Jan 15, 2011
- Messages
- 374
- Reaction score
- 1,070
Couple things last weekend. Added a better pump protector on the trailer using a type of foam that won’t absorb so much water like the last one.
Zip tied to the trailer and a bungee on the back to be able to lower it when I need to make pump adjustments. You would be amazed how much road grime ends up in the pump when you don‘t cover it.


Weather turned nice for a minute so pulled it outside and adjusted the timing to match my Grid.

The neighbors love me…..
Zip tied to the trailer and a bungee on the back to be able to lower it when I need to make pump adjustments. You would be amazed how much road grime ends up in the pump when you don‘t cover it.
Weather turned nice for a minute so pulled it outside and adjusted the timing to match my Grid.
The neighbors love me…..
Fonz69
Well-Known Member
- Joined
- Jan 15, 2011
- Messages
- 374
- Reaction score
- 1,070
Made my first test hits Saturday, it definitely hits harder and takes the rpm’s up to 7300+ then settles down to 6800 after the pump loads up. Only had 28 degrees of timing in it to play it safe and the same pump setup as the last motor. Ended up chucking the alternator belt on the last pass so I now have some different pulley options for the alternator on the way. Figures the first race is next Saturday and it’s suppose to rain  .
.
Still trying to figure out my new go pro camera but the gps didn’t lock in right away so I’ll have to start recording sooner I guess. Video shows 112 mph but the dash gps locked in at 114 mph so it’s an improvement. Now to start adding more shoe and free the hull up more.
.Still trying to figure out my new go pro camera but the gps didn’t lock in right away so I’ll have to start recording sooner I guess. Video shows 112 mph but the dash gps locked in at 114 mph so it’s an improvement. Now to start adding more shoe and free the hull up more.
Fonz69
Well-Known Member
- Joined
- Jan 15, 2011
- Messages
- 374
- Reaction score
- 1,070
Went up to Three Lakes for the Radar Run to do a little testing and adjust the shoe in the pump.
Had to enter the Unlimited class now since I have a supercharger but 3 passes on a closed course with divers and EMS on-site was a no brainer.
Of course a veteran racer who has twice the HP I’m making showed up as well and laid down the days best of 130 mph. Regardless 2 jet boats finished 1 & 2 for the day so that was a nice showing
Had my pit crew helping all day and managed to click off a 114 mph in the 1000’ course. Not too bad for dialing in the boat.

Camp “Bad Habit” setup and ready to go!
 1st and 2nd jet boats side by side.

Not a bad day up in the North Woods

Had to enter the Unlimited class now since I have a supercharger but 3 passes on a closed course with divers and EMS on-site was a no brainer.
Of course a veteran racer who has twice the HP I’m making showed up as well and laid down the days best of 130 mph. Regardless 2 jet boats finished 1 & 2 for the day so that was a nice showing
Had my pit crew helping all day and managed to click off a 114 mph in the 1000’ course. Not too bad for dialing in the boat.
Camp “Bad Habit” setup and ready to go!
Not a bad day up in the North Woods
Fonz69
Well-Known Member
- Joined
- Jan 15, 2011
- Messages
- 374
- Reaction score
- 1,070
UMPBA group event at Bullheads July 2023
Volunteered on the start boat the first half with my boys who had a great time, it was there first time that close to the action.

Volunteered on the start boat the first half with my boys who had a great time, it was there first time that close to the action.
Fonz69
Well-Known Member
- Joined
- Jan 15, 2011
- Messages
- 374
- Reaction score
- 1,070
Pulled off the Win!
Proud moment to win a race at my hometown track with my family there cheering me on

Showing some love for one of my sponsors that helped with my oil pan drain setup.

Proud moment to win a race at my hometown track with my family there cheering me on
Showing some love for one of my sponsors that helped with my oil pan drain setup.
HST4ME
Well-Known Member
- Joined
- Nov 9, 2015
- Messages
- 7,689
- Reaction score
- 18,064
Cool
Fonz69
Well-Known Member
- Joined
- Jan 15, 2011
- Messages
- 374
- Reaction score
- 1,070
Well we did it!
Brought home the UMPBA Unlimited Class High Points for 2023!
I have to refresh the motor and make some modifications to keep the blower cooler for all the hot laps. Anyone know of a sponsor looking to help let me know

Brought home the UMPBA Unlimited Class High Points for 2023!
I have to refresh the motor and make some modifications to keep the blower cooler for all the hot laps. Anyone know of a sponsor looking to help let me know
ChrisV
Well-Known Member
- Joined
- Nov 30, 2020
- Messages
- 4,786
- Reaction score
- 15,328
Badass and congrats man!
congrats man, that's an awesome accomplishment. I followed along losely and I know you've been through some chit with motors etc. Way to stay focused and committed to your goal and dream. Lets see the hardware...... how many seasons have you been racing this hull/boat/combo?Well we did it!
Brought home the UMPBA Unlimited Class High Points for 2023!
I have to refresh the motor and make some modifications to keep the blower cooler for all the hot laps. Anyone know of a sponsor looking to help let me know
View attachment 1282616
poncho
Well-Known Member
- Joined
- Dec 20, 2007
- Messages
- 6,242
- Reaction score
- 11,233
That is an awesome picture....hell of a job with the boat.Well we did it!
Brought home the UMPBA Unlimited Class High Points for 2023!
I have to refresh the motor and make some modifications to keep the blower cooler for all the hot laps. Anyone know of a sponsor looking to help let me know
View attachment 1282616
Fonz69
Well-Known Member
- Joined
- Jan 15, 2011
- Messages
- 374
- Reaction score
- 1,070
First season with this combo, our group holds a winter meeting and that’s where the awards are given out. I’ll make sure to post up some pics later when that happens.congrats man, that's an awesome accomplishment. I followed along losely and I know you've been through some chit with motors etc. Way to stay focused and committed to your goal and dream. Lets see the hardware...... how many seasons have you been racing this hull/boat/combo?
Fonz69
Well-Known Member
- Joined
- Jan 15, 2011
- Messages
- 374
- Reaction score
- 1,070
Jeff Bennet who did the bottom and set the intake on my hull was interviewed on a recent Podcast. If you read through my whole thread I have pictures of him working his magic on my hull. He has been a big help in getting me dialed in to make this heavy hull go down the track against boats that are literally 1000lbs lighter then me.
Its well worth a listen and he even mentioned me a couple times which I feel honored coming from his level of expertise.
Its well worth a listen and he even mentioned me a couple times which I feel honored coming from his level of expertise.
Fonz69
Well-Known Member
- Joined
- Jan 15, 2011
- Messages
- 374
- Reaction score
- 1,070
Been working on the rebuild of the 555, at first my plan was to check rod bolts and swap out lifters while doing a basic check up on things. This would be my first time opening up a motor for a rebuild. Now I have done a few minor repair and maintenance items in the past but never have I tore one apart this far and put it back together.
First off the motor ran great all season however does not like the type of hot lap racing we do and the more passes I make the worse it gets so that needs to be figured out. The last pass at Fremont I never should have done, motor was overheated and did not sound right, data had shown I was down 300hp and the club transponder speed had shown I was going over 8mph slower.
Motor coming out.


Bilge will need a good cleanup and I plan to work on the center where the water hazing happens. From what I understand I needed to put down a final coat over the resin to seal it…oops.
While removing all the lifters #1 intake was hard to get out and under further inspection it looks to have gotten stuck and in the process hung the valve and bent it.

Bore was showing marks where it got stuck.

Bent valve.

Also the pushrod must have jumped the rocker cup and marked it up.

First off the motor ran great all season however does not like the type of hot lap racing we do and the more passes I make the worse it gets so that needs to be figured out. The last pass at Fremont I never should have done, motor was overheated and did not sound right, data had shown I was down 300hp and the club transponder speed had shown I was going over 8mph slower.
Motor coming out.
Bilge will need a good cleanup and I plan to work on the center where the water hazing happens. From what I understand I needed to put down a final coat over the resin to seal it…oops.
While removing all the lifters #1 intake was hard to get out and under further inspection it looks to have gotten stuck and in the process hung the valve and bent it.
Bore was showing marks where it got stuck.
Bent valve.
Also the pushrod must have jumped the rocker cup and marked it up.
Fonz69
Well-Known Member
- Joined
- Jan 15, 2011
- Messages
- 374
- Reaction score
- 1,070
Started digging into the heads and found all the exhaust seats to be corroded and would need a cleanup. Also looking closer at the retainers something didn’t add up. I’m running PAC 1248 triple springs and the retainers were made for double springs. This setup would have likely put the center spring into coil bind and would explain some of the metal sparkles I was finding in the oil around the heads. Also the springs were shimmed on top of the spring cup….not a good idea.

Bent and wore spring shim

Old retainer on left and the correct new one on the right.

Checked all of the springs and they are still healthy and meet the loads when checked at the 2.100 install height and under full lift for both intake and exhaust.


Bent and wore spring shim
Old retainer on left and the correct new one on the right.
Checked all of the springs and they are still healthy and meet the loads when checked at the 2.100 install height and under full lift for both intake and exhaust.
Fonz69
Well-Known Member
- Joined
- Jan 15, 2011
- Messages
- 374
- Reaction score
- 1,070
When I pulled the crank trigger wheel off the crank I noticed one of the key ways wanted to work its way forward and got wedged against the degree wheel. I made an aluminum shim to stop that movement, the shim has .005 play so when compressed it would not move any of the parts farther away from each other.


Fonz69
Well-Known Member
- Joined
- Jan 15, 2011
- Messages
- 374
- Reaction score
- 1,070
On to more surprises, one of the rods seemed stiff on the pin when I pulled the pistons so took it apart and found some more bad news.
The pins were the G series that came with the Diamond pistons and were never meant to be pushed this hard and started to flex which galled up the piston pin bores and was wearing on the rod bushing. All had to come apart and new H13 tool steel replacements needed. Diamond and Trend did not have any so JE had some that were only .005 difference in wall thickness so went with those at .992 instead of the stock .990 to clean up the galling.


Noticed one of the valley screens was loose so popped it out and replaced it. Would not want that to come out!


Bores all cleaned up with a ball hone just to take the glaze off.

Washing and cleaning the passages in the block is not recommended on a cold WI day

The pins were the G series that came with the Diamond pistons and were never meant to be pushed this hard and started to flex which galled up the piston pin bores and was wearing on the rod bushing. All had to come apart and new H13 tool steel replacements needed. Diamond and Trend did not have any so JE had some that were only .005 difference in wall thickness so went with those at .992 instead of the stock .990 to clean up the galling.
Noticed one of the valley screens was loose so popped it out and replaced it. Would not want that to come out!
Bores all cleaned up with a ball hone just to take the glaze off.
Washing and cleaning the passages in the block is not recommended on a cold WI day
Fonz69
Well-Known Member
- Joined
- Jan 15, 2011
- Messages
- 374
- Reaction score
- 1,070
Time for the heads to go back together. Had Krings Motorsports clean up the seats and lap in the new intake and exhaust AFR valves, exhaust valves were replaced with the same inconel AFR ones also. New VTO retainers and AFR locks.


Of course not everything you order works flawlessly, my new spring micrometer would not let the retainer sit flush so I had to mill a couple thousands off the inner bore to make it work.

Fits now!

New LSM tool works great, I bought this style because I’m not a mass production shop and it will also let me swap springs on the head in case I ever need too.


Ready to go back on.

Of course not everything you order works flawlessly, my new spring micrometer would not let the retainer sit flush so I had to mill a couple thousands off the inner bore to make it work.
Fits now!
New LSM tool works great, I bought this style because I’m not a mass production shop and it will also let me swap springs on the head in case I ever need too.
Ready to go back on.
Fonz69
Well-Known Member
- Joined
- Jan 15, 2011
- Messages
- 374
- Reaction score
- 1,070
Short block going back together. Now through this whole process I’ve had help from the 2nd owner of my boat Richard who’s a very experienced engine builder and who has graciously offered to respond to all my questions and help with my rookie ambitions.
I checked the bores, with a bore gauge and plastigauge just to make sure and all seemed good to go. I’m running 20-50 oil so a little looser is better then too tight in this case!


Rev lube on the mains.


ARP lube on the studs to achieve the correct torque.
Verified crank thrust.

 timing set going back on and checking thrust I noticed it was out of spec.

Needs to be between .008 - .012 per Jesel.

Came in at .010 after pulling a shim out.

I checked the bores, with a bore gauge and plastigauge just to make sure and all seemed good to go. I’m running 20-50 oil so a little looser is better then too tight in this case!
Rev lube on the mains.
ARP lube on the studs to achieve the correct torque.
Verified crank thrust.
Needs to be between .008 - .012 per Jesel.
Came in at .010 after pulling a shim out.
Fonz69
Well-Known Member
- Joined
- Jan 15, 2011
- Messages
- 374
- Reaction score
- 1,070
Next up checking rods, verifying bolt stretch, pistons and spirolock fun.


Stretch needs to be .0055 and .0065 torque ended up at 85lbs.

Spirolock fun….after a little messing around I found that if you push on the very outer edge they go right in.


Hand filing rings for the first time, top rings suck but the 2nd rings go pretty quick just keep track of how many turns you make lol.


Checking crank to rod journal clearance.

Glad I bought the ring compressor made for this bore size they all dropped in like butter!

Verified bolt stretch on each rod bolt.

.025 side clearance between rods

Finally a short block!

Stretch needs to be .0055 and .0065 torque ended up at 85lbs.
Spirolock fun….after a little messing around I found that if you push on the very outer edge they go right in.
Hand filing rings for the first time, top rings suck but the 2nd rings go pretty quick just keep track of how many turns you make lol.
Checking crank to rod journal clearance.
Glad I bought the ring compressor made for this bore size they all dropped in like butter!
Verified bolt stretch on each rod bolt.
.025 side clearance between rods
Finally a short block!
Fonz69
Well-Known Member
- Joined
- Jan 15, 2011
- Messages
- 374
- Reaction score
- 1,070
Verified TDC and checked intake lobe centerline which according to my cam card is supposed to be 111. After triple checking I came up with 110 so just a quick adjustment on the Jesel by retarding 1 degree and it all added up to 111 like it should. Guess it ran fine at 110 this whole time but I’d rather follow the cam card for the dyno session and see what we get.

 Intake gaskets on.

Ow I noticed some oil pushing out around the china walls before so I dimpled the block and intake to hopefully aid the sealer to not leak.


Ow I noticed some oil pushing out around the china walls before so I dimpled the block and intake to hopefully aid the sealer to not leak.
Fonz69
Well-Known Member
- Joined
- Jan 15, 2011
- Messages
- 374
- Reaction score
- 1,070
When reassembling the crank trigger I noticed the bolts would bottom out and the spacers would turn a little. Had to turn down the bolts by 1/4” and then mill the spacers to be equal and now they fit perfect!

Since the motor will need to be transported to the dyno and might be a little bit I made up some block off plates out of leftover composite materials I had laying around.


Long block ready for some break in oil to check psi prime and get some oil moved around in the channels. Then drop in the distributor and top it off with the blower.

Since the motor will need to be transported to the dyno and might be a little bit I made up some block off plates out of leftover composite materials I had laying around.
Long block ready for some break in oil to check psi prime and get some oil moved around in the channels. Then drop in the distributor and top it off with the blower.
Fonz69
Well-Known Member
- Joined
- Jan 15, 2011
- Messages
- 374
- Reaction score
- 1,070
In an effort to help cool things off next season I’ll be switching to E85 from VP since this will lower my intake temps I hope to make good power and chemically cool things down to survive multiple passes.
Sent the carbs back to the builder Pro Systems to convert them over to E85. They will definitely be thirsty since I ran 98 jets on Q-16 and now they come back with 158s


Sent the carbs back to the builder Pro Systems to convert them over to E85. They will definitely be thirsty since I ran 98 jets on Q-16 and now they come back with 158s
Eliminator21vdrive
Well-Known Member
- Joined
- Jul 5, 2016
- Messages
- 2,601
- Reaction score
- 5,783
Were the new piston pins the same weigh ?
Fonz69
Well-Known Member
- Joined
- Jan 15, 2011
- Messages
- 374
- Reaction score
- 1,070
According to the machine shop who bored the pistons and rods they were very close and would not require me to rebalance everything.Were the new piston pins the same weigh ?
stoker2001
Well-Known Member
- Joined
- Apr 14, 2013
- Messages
- 1,028
- Reaction score
- 979
300HP blender in background representing..probably someone i know,even tho i never get out of Cali..Well we did it!
Brought home the UMPBA Unlimited Class High Points for 2023!
I have to refresh the motor and make some modifications to keep the blower cooler for all the hot laps. Anyone know of a sponsor looking to help let me know
View attachment 1282616
HST4ME
Well-Known Member
- Joined
- Nov 9, 2015
- Messages
- 7,689
- Reaction score
- 18,064
Wow, you dodged one there.
HydroSkreamin
StressEliminator
- Joined
- Jan 12, 2014
- Messages
- 2,153
- Reaction score
- 5,974
@Fonz69 you definitely thrust yourself into some pretty deep engine work there, and as HST4ME said, you dodged a number of bullets there.
I’d highly recommend a dyno session over in Green Lake, WI at Advance Engine Concepts. Dan Timm will treat you right and is a wiz at dialing in carbs, especially E85 stuff. He’s got a nice exhaust gas analyzer that he’s good at reading also.
I’ve worked with Dan on a number of projects, both marine and automotive. Dan was Carl Wegner’s right hand man for 20+ years until he and Paul opened their own shop.
(920) 294-0474 is the shop number. Talk to Dan or Paul and let them know Johnny B sent you. When they stop laughing, tell them what your goals are and I guarantee they’ll set you up. This is who I use for machine work and dyno services. I’ve got 2-3 projects there currently.
Fonz69
Well-Known Member
- Joined
- Jan 15, 2011
- Messages
- 374
- Reaction score
- 1,070
You’re the 2nd guy who recommended Advance Engine Concepts. Harold FURO also mentioned that’s where he would send engines. Since my usual go to dyno guy has his still down I will reach out to Dan and check on availability for dyno session.@Fonz69 you definitely thrust yourself into some pretty deep engine work there, and as HST4ME said, you dodged a number of bullets there.
I’d highly recommend a dyno session over in Green Lake, WI at Advance Engine Concepts. Dan Timm will treat you right and is a wiz at dialing in carbs, especially E85 stuff. He’s got a nice exhaust gas analyzer that he’s good at reading also.
I’ve worked with Dan on a number of projects, both marine and automotive. Dan was Carl Wegner’s right hand man for 20+ years until he and Paul opened their own shop.
(920) 294-0474 is the shop number. Talk to Dan or Paul and let them know Johnny B sent you. When they stop laughing, tell them what your goals are and I guarantee they’ll set you up. This is who I use for machine work and dyno services. I’ve got 2-3 projects there currently.
Just finished up getting it ready today but might be a little bit before I can get down that way for a dyno session. Works been busy which is good but also makes it difficult to get away you know?
Fonz69
Well-Known Member
- Joined
- Jan 15, 2011
- Messages
- 374
- Reaction score
- 1,070
Dropped in some 30 weight break in oil and made good oil psi.


So I didn’t really like the scoop tray hold down that was on the motor when I got it mostly because it was a large bar that laid across both carbs and used the center threaded connection of each carb. My thought was this might disturb the flow into the carbs at WOT, probably not the worse thing but I still felt it could be better.
I made a couple brackets to clamp the front and rear lips of the carbs and grooves them out so you only need. 3/16” allen key to remove the bolt.

Old setup with the bar hold down

Much cleaner now.

All ready for a dyno. Might be a little bit before I have time for that but now it’s time to top coat the center between the seats and the bilge area that I should have done last year….did I ever mention how much I hate sanding in my shop oh well has to get done as I’m tired of seeing the milky white look whenever the open resin gets exposed to water.


So I didn’t really like the scoop tray hold down that was on the motor when I got it mostly because it was a large bar that laid across both carbs and used the center threaded connection of each carb. My thought was this might disturb the flow into the carbs at WOT, probably not the worse thing but I still felt it could be better.
I made a couple brackets to clamp the front and rear lips of the carbs and grooves them out so you only need. 3/16” allen key to remove the bolt.
Old setup with the bar hold down
Much cleaner now.
All ready for a dyno. Might be a little bit before I have time for that but now it’s time to top coat the center between the seats and the bilge area that I should have done last year….did I ever mention how much I hate sanding in my shop
oh well has to get done as I’m tired of seeing the milky white look whenever the open resin gets exposed to water.
Last edited:
Looks great! I know what you mean about sanding in the shop. If I cant use the vacuum adaptor on the sander for the job, it has to wait to be done outside. Did you know about these Dominator scoop adaptor lates?

 www.summitracing.com
R,
HAP
Holley 17-85 Holley Gen 3 Dominator Air Scoop Mounting Adapters | Summit Racing
Free Shipping - Holley Gen 3 Dominator Air Scoop Mounting Adapters with qualifying orders of $109. Shop Hood Scoop Mounting Kits at Summit Racing.
R,
HAP
Fonz69
Well-Known Member
- Joined
- Jan 15, 2011
- Messages
- 374
- Reaction score
- 1,070
Pretty cool looking mount for sure. After all the surprise issues with the motor refresh the $185.95 they want x2 would be a little much for me to invest in. Still trying to save up for a RacePak data systemLooks great! I know what you mean about sanding in the shop. If I cant use the vacuum adaptor on the sander for the job, it has to wait to be done outside. Did you know about these Dominator scoop adaptor lates?
Holley 17-85 Holley Gen 3 Dominator Air Scoop Mounting Adapters | Summit Racing
Free Shipping - Holley Gen 3 Dominator Air Scoop Mounting Adapters with qualifying orders of $109. Shop Hood Scoop Mounting Kits at Summit Racing.
R,
HAP
Fonz69
Well-Known Member
- Joined
- Jan 15, 2011
- Messages
- 374
- Reaction score
- 1,070
Well started the removal of everything in the way to lay down some Duratec sun shield top coating in the center pod section.


need to dress up the quick hack job I did last season when I had to remove the center bilge board since it wouldn’t clear the oil pan.

Also modifying the pump brace to run hoses and cables through it instead of over it, sometimes it’s just the little things that you see and annoy you enough to disassemble and try again lol.

With the new 4Runner tow vehicle I don’t really want to haul fuel jugs inside the cabin so I moved the spare tire below with plans of adding a dual jug fuel rack above the tire. More to come on that soon, along with extending the trailer wiring since the 4Runner connects under the bumper cover
need to dress up the quick hack job I did last season when I had to remove the center bilge board since it wouldn’t clear the oil pan.
Also modifying the pump brace to run hoses and cables through it instead of over it, sometimes it’s just the little things that you see and annoy you enough to disassemble and try again lol.
With the new 4Runner tow vehicle I don’t really want to haul fuel jugs inside the cabin so I moved the spare tire below with plans of adding a dual jug fuel rack above the tire. More to come on that soon, along with extending the trailer wiring since the 4Runner connects under the bumper cover
I bought one as a mounting solution, but ended up going with a Garlits style scoop. Just finished repowering with a Ford Performance 572 crate engine and all of the challenges associated with it and the new custom dry tail pipe set up. So I know the $ deficit end as well ") .
.
Happy New Year.
R,
HAP
. Happy New Year.
R,
HAP
Fonz69
Well-Known Member
- Joined
- Jan 15, 2011
- Messages
- 374
- Reaction score
- 1,070
Well today was sanding and itching and making a dusty mess in my shop…

Picked up some Duratec Sun Shield to use after I sanded out all of the 700 vinyl ester resin that never setup properly last spring.

All sanded out and cleaned up.

Hope it cures properly. The shop is at 70 and the mixing pots I used all locked up nice so hopefully tomorrow all will be good.


Picked up some Duratec Sun Shield to use after I sanded out all of the 700 vinyl ester resin that never setup properly last spring.
All sanded out and cleaned up.
Hope it cures properly. The shop is at 70 and the mixing pots I used all locked up nice so hopefully tomorrow all will be good.
Fonz69
Well-Known Member
- Joined
- Jan 15, 2011
- Messages
- 374
- Reaction score
- 1,070
Found a nice fuel rack online to hold the additional fuel instead of bringing along inside the 4Runner. I’ll have to weigh the tongue when they are full and see how much I end up with on the hitch.


Boats back together again so now it’s just acquire some X85 fuel, and make the appointment at AEC in Green Lake to tune in the bullet.

Boats back together again so now it’s just acquire some X85 fuel, and make the appointment at AEC in Green Lake to tune in the bullet.
Fonz69
Well-Known Member
- Joined
- Jan 15, 2011
- Messages
- 374
- Reaction score
- 1,070
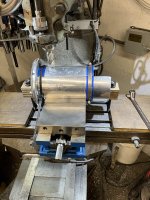
In an effort to loss a little weight in the boat I figured that lightening the driveline cover might help. The flex plate cover is over at Harold’s for some crack repairs and reinforcement so I figured I’d get these ready.

Im not sure how real machinest do this but I used tape cut to the size of the half pipe I was cutting, then found center and spaced out the sections evenly. Installed the tape back on the half pipe on each end and used that to guide my cuts.

The first cut was easy then I realized the rest would be more difficult to lock down on the table.

I ended up making a ring using the bolt holes to stabilize the one end then 2 hose clamps to lock down the right side. Found a section of old dock leveler and used that to hold it in the vice and down to the table.

I plan to use a nice band clamp on the opposite side of the cover but I think it turned out decent. Now I’m not sure yet if it needs to stay polished or be black?

Im not sure how real machinest do this but I used tape cut to the size of the half pipe I was cutting, then found center and spaced out the sections evenly. Installed the tape back on the half pipe on each end and used that to guide my cuts.
The first cut was easy then I realized the rest would be more difficult to lock down on the table.
I ended up making a ring using the bolt holes to stabilize the one end then 2 hose clamps to lock down the right side. Found a section of old dock leveler and used that to hold it in the vice and down to the table.
I plan to use a nice band clamp on the opposite side of the cover but I think it turned out decent. Now I’m not sure yet if it needs to stay polished or be black?
Attachments