

Racey
Maxwell Smart-Ass
- Joined
- Sep 18, 2007
- Messages
- 22,783
- Reaction score
- 53,087
The wizdom section has been lacking some love, i decided to put together a quick little tutorial on sharpening your drills. Hand sharpening drills is not as difficult as one would think, and in many cases my hand sharpened drills will out-perform the 'out of the box' sharpening job that comes on the drill.
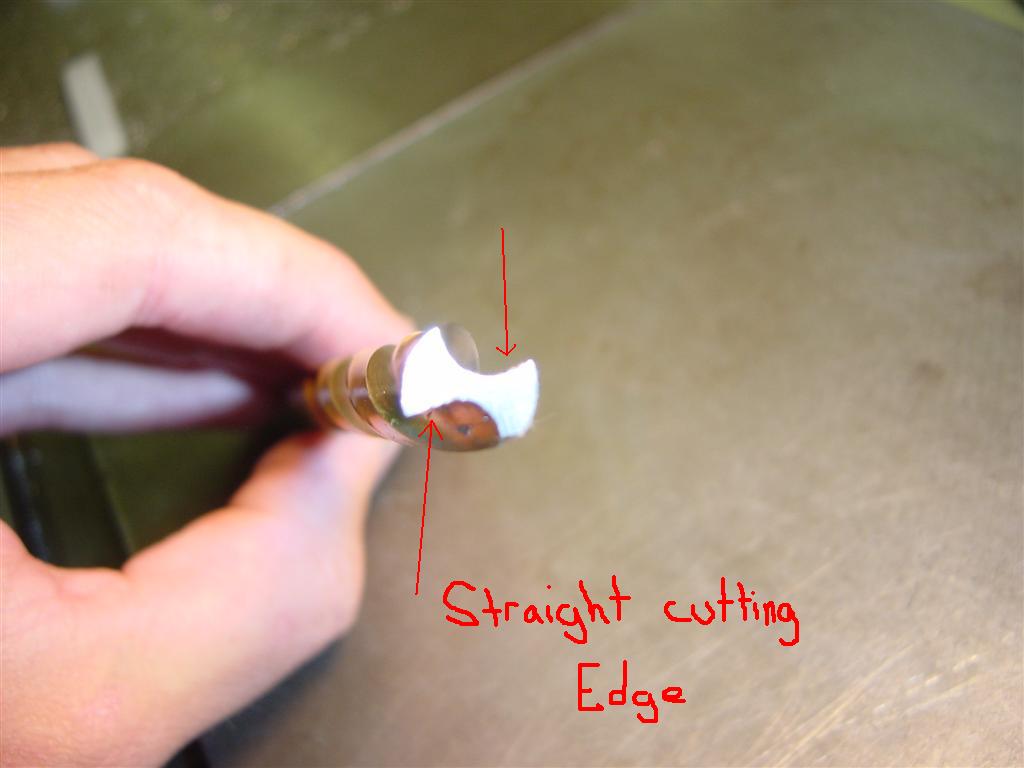
I blunted a drill to show your worse case scenario for sharpening. Take note of how the spiral has a flat edge on the cutting side. and is rounded on the trailing side

When sharpening drills you are dealing with 2 separate angles, the first angle is the cutting angle, or knife angle, the second angle is what i refer to as 'the compound angle'. In most cases the knife angle should be just shy of flat, this gives the most edge strength at the tip of the drill. The compound angle is more commonly adjusted (Normal drills are 118degrees, hard material drills have thicker center webs are normally 135 degrees, blunt flat is 180 degrees), the sharper the compound the better the drill will center itself, or spot holes, but the harder the drill will work to cut holes. The blunter the angle the better the drill will work on hard materials because the cutting edge will be shorter meaning less contact between the cutting edge and the material being drilled, less cutting per rotation, hence less torque load on the drill.


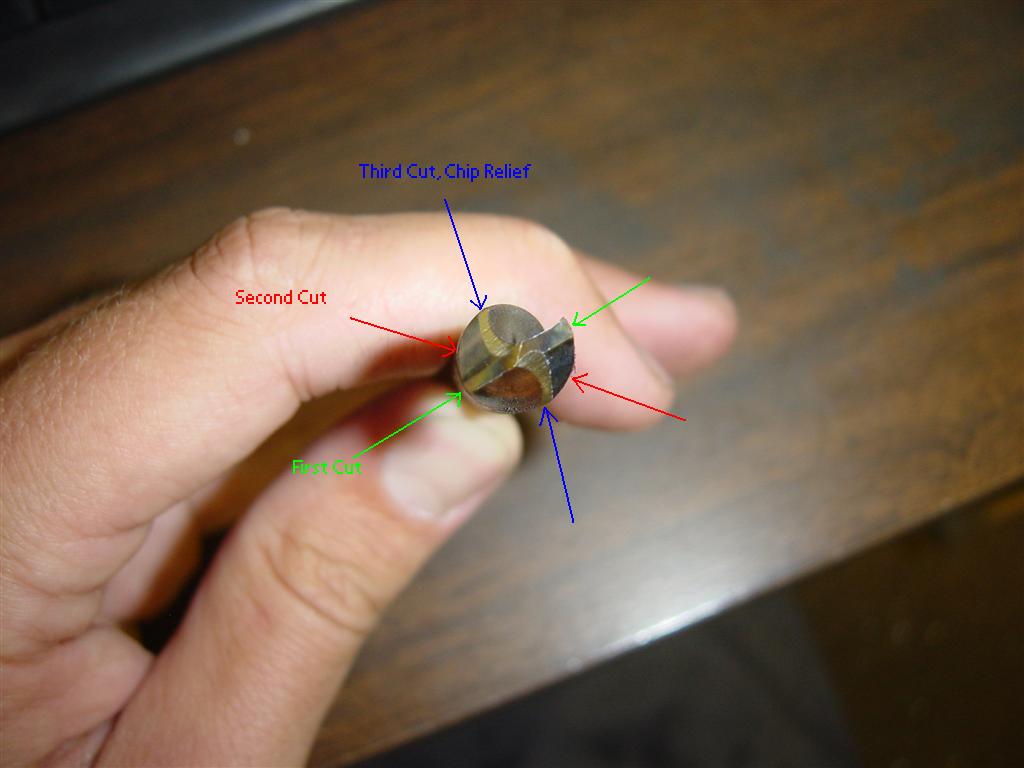
the first cut you make is a combination of both your knife angle, and the compound angle, this will form the cutting edge of the drill bit. You are looking for the cutting edge to be just about knife sharp, if you run your thumb across it, it should feel very sharp like a knife.


once you have both sides of the drill matched with the first cut (equal grind on both sides, the point should meet perfectly in the center of the drill) You will make a second cut at the same compound angle, but with a slightly steeper knife angle, this cut will start just behind the cutting edge and extend the rest of the way back down the drill. This cut provides an open path for the chips to escape from the following cutting edge during drilling.

The final cut you will make is center chip relief and 'zero point' cut, in this cut you will use the edge of the wheel and at a steep angle cut into the trailing edge as shown below. Be careful not to touch the knife edge of the opposite side to the wheel, the closer you can get these 2 cuts to come together the better the drill will work at drilling a hole without a pilot (the center of the drill will provide easier cutting). If you notice this grinding wheel sucks, it no longer has a sharp edge, so this isn't the greatest example of a center cutting drill, This is why you try to keep your wheels square, then you can get these two points to meet much sharper, and cut better.


I blunted a drill to show your worse case scenario for sharpening. Take note of how the spiral has a flat edge on the cutting side. and is rounded on the trailing side
When sharpening drills you are dealing with 2 separate angles, the first angle is the cutting angle, or knife angle, the second angle is what i refer to as 'the compound angle'. In most cases the knife angle should be just shy of flat, this gives the most edge strength at the tip of the drill. The compound angle is more commonly adjusted (Normal drills are 118degrees, hard material drills have thicker center webs are normally 135 degrees, blunt flat is 180 degrees), the sharper the compound the better the drill will center itself, or spot holes, but the harder the drill will work to cut holes. The blunter the angle the better the drill will work on hard materials because the cutting edge will be shorter meaning less contact between the cutting edge and the material being drilled, less cutting per rotation, hence less torque load on the drill.
the first cut you make is a combination of both your knife angle, and the compound angle, this will form the cutting edge of the drill bit. You are looking for the cutting edge to be just about knife sharp, if you run your thumb across it, it should feel very sharp like a knife.
once you have both sides of the drill matched with the first cut (equal grind on both sides, the point should meet perfectly in the center of the drill) You will make a second cut at the same compound angle, but with a slightly steeper knife angle, this cut will start just behind the cutting edge and extend the rest of the way back down the drill. This cut provides an open path for the chips to escape from the following cutting edge during drilling.
The final cut you will make is center chip relief and 'zero point' cut, in this cut you will use the edge of the wheel and at a steep angle cut into the trailing edge as shown below. Be careful not to touch the knife edge of the opposite side to the wheel, the closer you can get these 2 cuts to come together the better the drill will work at drilling a hole without a pilot (the center of the drill will provide easier cutting). If you notice this grinding wheel sucks, it no longer has a sharp edge, so this isn't the greatest example of a center cutting drill, This is why you try to keep your wheels square, then you can get these two points to meet much sharper, and cut better.
Last edited:
")


